Connect this circuit between the back amplifier output and the back speakers.
Hafler enhancement
- Adjust the Autovary control to adjust the amount of Autovary effect that is applied to the sound.
- Autovary reduces the separation between the back speakers when a strong center front signal appears.
- The lamp shows when Autovary is acting on the signal.
- This circuit works for matrix systems where the back speakers are normally out of phase for sounds panned to the back.
- Autovary does not work for Sansui QS, any SQ decoder, or Dolby Surround. The outputs to the back speakers of these systems are in phase with each other.
- Autovary does work with Dynaquad if placed between the decoder and the speakers.
How Autovary works:
The resistance of the lightbulb increases to about 8 times its cold value when
it is hot.
It becomes hot when there is a strong center front signal.
This increase decreases the separation between the back speakers, moving them
farther from a center front signal.
Build and use the UQ-1A passive decoder for your home theater speakers.
- Adjust the WIDTH control near maximum and the DEPTH control near maximum.
- It works for Sansui QS and Dolby Surround recordings.
Surrfield Mic
Build and use a Surrfield mic for your church.
- Hang the Surrfield mic from the ceiling about a third of the way back in the sanctuary from the stage or dais.
- It must be at least 20 feet away from the active mics. Hang it overhead with two spaced wires so it will not rotate.
- Make sure the PA speakers are not aimed at the Surrfield mic. Aim them lower.
- Use the other channel strips on the mixer for the normal mics used in the service. Pan them where you want them to be in the radio program.
- Mix the PA signals without the surrfield mics.
- Mix the radio signals with the surrfield mics.
- Use buses to make alternate mixes for the PA and for the radio program.
- Often the main buses can be used for the radio mix and an after-fader aux send can be used for the PA. This lets you turn down an acoustic instrument (e.g. guitar) in the PA while keeping it at full strength for the radio.
- Use headphones to monitor the mix being sent out over the air.
- You can listen to the broadcast with a mono radio, stereo radio, stereo headphones, Dolby Surround, Dolby Pro-Logic, Sansui QS, Regular Matrix, UQ-8A, or even the UQ-1 or UQ-1A quadraphonic decoders.
- When members of the congregation are singing, it will seem to surround the listener listening to a surround sound system or quadraphonic system. Individual people who are singing will be heard from where they are actually standing or sitting.
- With the Surrfield mic, no sounds will disappear if the service is listened to in mono.
This can be used to broadcast other kinds of meetings and special events.
A simple encoder insert device lets you encode matrix surround sound with a 4-bus mixer with submaster bus inserts.
- The encoder insert device goes in SUB 3 (L) and SUB 4 (R) inserts. Only one device is needed.
- The encoder insert shown here is for inserts with TRS connectors for both insert and return in the same jack. For other kinds of insert connectors, additional diagrams are at the bottom of this page.
- This will encode mixes that play properly on Dolby Surround, Dolby Pro Logic, QS, RM, EV-4, and Dynaquad.
- Each channel strip's encode position is encoded independently.
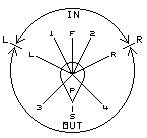
The entire panning locus is a circle, shown in the diagram (right).
- Ignore the numbers in the diagram (They refer to pan positions mentioned in another web page using the same image).
- The PAN control positions the sound in the left-to right direction (arrows, right).
- When mix buses 1 and 2 are selected, the encoding is in the front (IN, right).
- When mix buses 3 and 4 are selected, the encoding is in the back (OUT, right).
- With the channel strip shown, depress the SUB 3/4 button to select back.
- With the channel strip shown, release the SUB 3/4 button to select front.
- Other mixers have selectors for both SUB 1/2 and SUB 3/4. Select one or the other as above. Never select both bus pairs at the same time.
House Surround
Use a Dolby surround or Dolby Pro-Logic receiver and the encoder device to put your band in live surround sound.
- The page author has even used a high-power Dynaquad design and a stereo amp for this.
- You need a 4-bus mixer with submaster bus inserts.
- The encoder insert device goes in SUB 3 (L) and SUB 4 (R) inserts. Only one encoding device is needed.
- Each channel strip's encode position is encoded independently.
- The encoding of each part is done in the same way it is done in the item above.
- Selection of the buses is done in the same way it is done in the item above.
- Place the mixer where the sound man can hear the results of the surround mix.
- A recording of the mix can be made while the band plays live. But note that some acoustic instruments might be under-represented in this mix.
- Often the main buses can be used for the recording mix and after-fader aux sends can be used for the PA. This lets you turn down an acoustic instrument (e.g. guitar) in the PA while keeping it at full strength for the recording.
- Use headphones to monitor the mix being sent to the recording.
- Another way to balance the acoustic instruments is to make the recording with no audience present.
- If a recording is made of the live performance, a Surrfield mic can be used in the recording.
- Do not mix the Surrfield mic into the house PA. It should be overhead (out of reach of audience) and at least 20 feet from the stage.
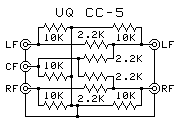
With or Without Center
This circuit can be used to either add a front center channel to a quadraphonic source or to include center channel content into a 4-speaker system with no center channel speaker.
To create a center channel signal from a quadraphonic source:
- Connect the quadraphonic front decode outputs to the jacks on the right of the diagram.
- Connect the three front channel jacks on the left to the three front channel amp inputs.
To include a center channel signal into quadraphonic speakers:
- Connect the surround front decoded source to the jacks on the left of the diagram.
- Connect the two jacks on the right to the quadraphonic front channel amp inputs.
Hafler Ambience
An ambience recovery speaker can be added to a stereo system.
- If you have no exposure to surround sound, this might be a good introduction.
- This uses the Hafler method to recover hidden ambience.
- Connect the ambience speaker across the hot terminals of the stereo amplifier outputs.
- Place the ambience speaker on the opposite side of the room from the stereo speakers.
- An L-pad or a 50Ω rheostat can be inserted in the wires to the back speaker.
- Most stereo recordings contain some ambient sounds picked up by the multiple microphones used to make the recording. This ambience usually comes out the back speaker.
- This also does a basic job of decoding Dolby Surround, Surrfield, QS, EV-4, and Dynaquad.
- Do not drive the amp at its full power. This circuit adds extra loading to the amp outputs.
Hafler Ambience in car
This is the same trick used in the project above.
One problem is that there are several different kinds of car stereos:
- Single-ended amps with all of the [-] terminals common to the car ground.
- This circuit should work quite well with single-ended outputs. - Double-ended amps with both the [+] and [-] terminals actively driven with no
feedback from the speaker terminals.
- This circuit could work quite well with these double-ended outputs, but it might not. - Double-ended amps with both the [+] and [-] terminals actively driven with
feedback directly from the speaker terminals.
- This circuit probably will not work with these double-ended outputs, but it might work.
- One idea is to make the connections and then
try the setup at low volumes first, then at higher and higher levels
• If the sound is distorted, stop immediately and disconnect the circuit. This
indicates the circuit is not compatible with the amp.
- Mount the new speaker on the back deck behind
the passengers.
• Possibly four small speakers can be put behind the passengers and wired in
series-parallel instead of using one large speaker.
- Mount the 50Ω rheostat where the driver can operate it.
- The rheostat adjusts the amount of ambience effect. Turn it to maximum resistance to effectively silence the speaker.
- Adjust the fader first, then set the ambience level on the new control.
- Most stereo recordings contain some ambient sounds picked up by the multiple microphones used to make the recording. This ambience usually comes out the back speaker.
- This also does a basic job of decoding Dolby Surround, Surrfield, QS, EV-4, and Dynaquad.
- Do not drive the amp at its full power. This circuit adds extra loading to the amp outputs.
Method 1: Adding several low volume speakers plugs the holes between the speakers.

Spread
- In this system, a small speaker is placed on
each side of the main speaker for each channel and played at a lower level.
These speakers form a rough dodecagon collapsed into a square.
The main speaker is normally heard unless the sound source is between the speakers.
Then the small speakers are found by the ears to be the sound source because their
sounds add together.
- The tiny bumps in the diagram are L-pads or 50Ω rheostats used to reduce the volume of the small speakers to the correct level.
- Provision of many channels keeps the ear from finding the speaker location instead of the sound location.
Adding several low volume speakers plugs the holes between the speakers.
Method 2: Adding low volume speakers farther away on opposite sides, faking the Surrfield mic results.

Cross
Imager
- In this system, a small speaker is diametrically
opposite and farther away from a main speaker for each channel and played at a lower level.
These speakers form the opposite-ear signals for the main speakers.
If there is not space to place these speakers farther away, bounce them off the walls.
These make the speakers locate themselves properly in human hearing.
- The tiny bumps in the diagram are L-pads or 50Ω rheostats used to reduce the volume of the small speakers to the correct level.
With these extra speakers, the hearing system can locate a sound panned between the main speakers on one side of the listener.
Method 3: Adding low volume speakers farther away in adjacent corners, faking the Surrfield mic results.

Side
Imager
- In this system, a small speaker is placed in the
adjacent corner and farther away from a main speaker for each channel. It is played at a
lower level.
These speakers form the opposite-ear signals for the main speakers.
If there is not space to place these speakers farther away, bounce them off the walls.
These make the speakers locate themselves properly in human hearing.
- The tiny bumps in the diagram are L-pads or 50Ω rheostats used to reduce the volume of the small speakers to the correct level.
With these extra speakers, the hearing system can locate a sound panned between the main speakers on one side of the listener.
Method 4: Adding low volume speakers and delay tubes, faking the Surrfield mic results.

Tube
Imager
- In this system, small speaker are placed at the
ends of sound tubes. The sound goes through the sound tube and comes out the other end with
a delay.
These speakers delayed in the tube form the opposite-ear signals for the main
speakers. The delay needed determines the length of the tube.
This could work with just a tube with the ends placed near the main speakers, but
it would be harder to control.
These make the speakers locate themselves properly in human hearing.
- The tiny bumps in the diagram are L-pads or 50Ω rheostats used to reduce the volume of the small speakers to the correct level.
With these extra speakers and delay tubes, the hearing system can locate a sound panned between the main speakers on one side of the listener.

Quadraphonics to Headphones
This circuit is an adaptation of Jon Fixler's original circuit for making quadraphonics work with ordinary headphones.
- This is designed to be connected to two stereo amps connected to a quadraphonic source, a quadraphonic amp, or quadraphonic headphone outputs.
- Connect the sound source to the screw terminals and plug the headphones into the headphone jack. Any decoded or discrete source can be used.
- Play a stereo source into the back channels and adjust the DEPTH control so the sounds appear to be behind the headphones. Turning it too far makes all of the sounds come from the center back of your head. Adjust the DEPTH control before the WIDTH control.
- Play a stereo source into the front channels and adjust the WIDTH control so the sounds appear to be above the headphones. Turning it too far makes all of the sounds come from the top center of your head. Note that adjusting the DEPTH control changes the effect of the WIDTH control.
- Adjust the levels of the front and back amps so the sounds are at the same level for front and back.
- How and why it works and why the sounds appear where they do is explained in my description of Quadraphonic Headphones Dichophony.
- You can also use Quadraphonic Dichophony to listen to an RM, QM, or SQ recording through this by feeding a stereo source from the matrixed record to the front channels and turning the WIDTH and DEPTH controls all the way down.

CHOOSE THE TYPE OF ENCODER ADAPTOR TO MATCH THE KIND OF SUBMASTER INSERTS YOU HAVE.
- Use the balanced insert adaptor ONLY if you have separate balanced submaster insert and return jacks.
- DO NOT use the balanced adaptor with impedance-balanced insert or return jacks. Some signals disappear in this case.
- Use the unbalanced insert adaptor if you have separate unbalanced (or impedance-balanced) submaster insert and return jacks.
- Use the TRS insert adaptor ONLY if you have combined submaster insert and return in the same jack.