SURROUND FIELDS
Most surround sound is recorded as a mixdown of individual tracks, panned in a mixer to produce a convincing
effect. But these techniques do not record the actual conditions someone would actually hear in the field.
The following technique can capture the actual sound in the field, and also reproduces it without the
separation-enhancing logic usually needed with matrix surround systems.
DISCOVERY OF THE SURROUND FIELD
The page author set up the three mic design as indicated as an experiment to record a solo vocalist, and
try to also capture some of the room reverberation. The soloist was about two feet from the L and R mics.
The soloist practiced the part a few times before the first take. Then we recorded the take.
The author rewound the tape to play it through the stereo monitor speakers, and started the tape playing
at the beginning. Then the following conversation took place:
Author: "Would you please stop practicing? I want to hear the tape."
Soloist: "That's not me. It's the tape!"
It sounded so real that the page author didn't realize it was the tape playing. He thought it was the
soloist practicing again.
The page author then continued to experiment and perfect the system over several years.
RECORDING THE SURROUND FIELD
Surrfield modulations
Poincaré Surrfield
Spheround modulations
Poincaré Spheround
The surround field mic cluster can be used either alone or with close miked musicians. Amazingly, they
don't interfere with each other.
The following method is used to record a surround field"
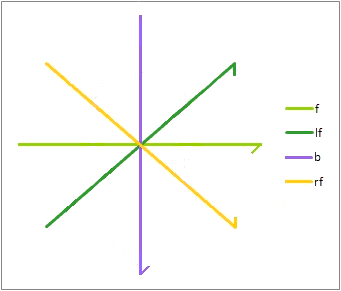
- The surround field microphone cluster is usually made with three cardioid mics. I call it the
"Surrfield" system.
- The explanation of the phonograph stylus vector diagram at right is described in
How Stereo is Recorded.
- The left mic element is positioned 5 inches to the left of the center of the cluster, and is pointed
45 to 60 degrees to the left of a line pointing directly forward.
- The right mic element is positioned 5 inches to the right of the center of the cluster, and is pointed
45 to 60 degrees to the right of a line pointing directly forward.
- In a three-mic cluster, the surround mic element is 12 inches behind the center of the cluster, and
points directly backward, away from the primary sound source. This is labeled "b" in the
diagram.
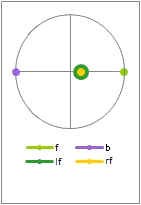
- The explanation of the Poincaré sphere shown at right is described in
The Poincaré Energy Sphere.
- The left and right mics produce the modulations shown by the dark green and yellow arrows and points
on the sphere.
- The front sound is picked up equally in both the left and the right mics, and is shown by the
yellow-green vector and point on the sphere.
- The surround (back) mic produces the modulation shown by the violet arrow and point on the
sphere.
- All sounds are recorded by all three mics. The delays between the mics create the surround field.
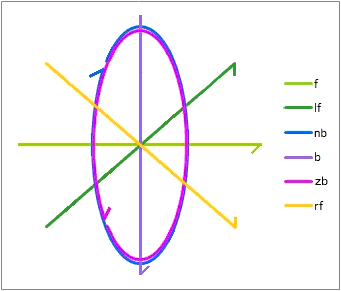
- The surround field microphone cluster has four mics when vertical directionality is also needed. I call it
the "Spheround" system.
- The left and right mics are the same as the left and right mics in the three-mic cluster.
- In a four-mic cluster, the zenith surround mic element is 12 inches behind the center of the cluster,
5 inches above the level of the center of the cluster, and angled 30 to 60 degrees above straight
backward.
- In a four-mic cluster, the nadir surround mic element is 12 inches behind the center of the cluster,
5 inches below the level of the center of the cluster, and angled 30 to 60 degrees below straight
backward.
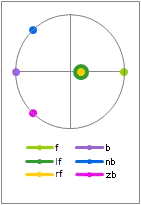
- The left and right mics produce the modulations shown by the dark green and yellow arrows and points
on the Poincaré sphere.
- The front sound is picked up equally in both the left and the right mics, and is shown by the
yellow-green vector and point on the sphere.
- The zenith surround mic produces the modulation shown by the magenta arrow and point on the sphere.
Note the anticlockwise rotation of the stylus vector.
- The nadir surround mic produces the modulation shown by the blue arrow and point on the sphere.
Note the clockwise rotation of the stylus vector.
- The surround (back) sounds from directly behind is picked up equally by both surround mics, and is
shown by the violet arrow and point on the sphere.
- All sounds are recorded by all four mics. The delays between the mics create the surround field.
- The surround field mic cluster can be used alone, or combined with close mics for soloists or a mix
from a band's house mixer.
- When the surround field cluster is used with close mics or the mix from a band, place the cluster at
least 20 feet away from the front of the band.
- Make sure that every signal using a close mic is also in the sound picked up by the cluster.
- If a live audience is to be present, the cluster should be at least 11 feet above the floor, preferably
where it won't be disturbed by the audience. This also makes sure the audience does not drown out the
desired sound.
The field mics should be wired to a mixer as follows:
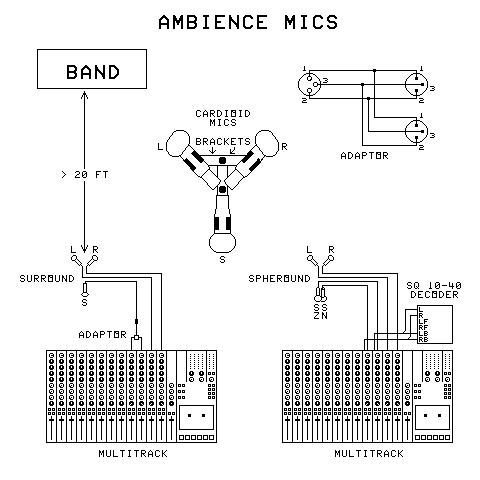 Connect the left mic to a channel strip that is panned left (or slightly in from left).
- Connect the right mic to a channel strip that is panned right (or slightly in from right).
- If a 3-mic system is used:
- Connect the surround mic to the adaptor. *
- Connect the adaptor to two channel strips. Pan one strip hard left, the other strip hard right.
- If a 4-mic system is used:
- Connect the surround zenith mic to a channel strip panned hard right.
- Connect the surround nadir mic to a channel strip panned hard left.
- Connect the surround zenith channel insert send to the left channel input of an SQ 10-40
decoder. **
- Connect the surround zenith channel insert return to the left back output of the SQ decoder.
- Connect the surround nadir channel insert send to the right channel input of the SQ decoder.
- Connect the surround nadir channel insert return to the right back output of the SQ decoder.
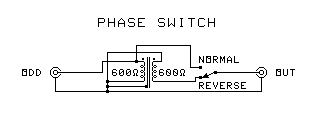
* Use the adaptor in the image above for a balanced-line mic. For the unbalanced mic, connect the mic
to one channel strip, and connect its channel strip insert send to the return of another channel strip
through this circuit set in the reverse position.
** The use of an SQ decoder as an encoder is covered here.
PLAYING BACK THE SURROUND FIELD
Any of the following can be used to play back the sound field:

An ordinary stereo system works fine, but won't fully reproduce the surround
effect.

A Dolby Surround system works. The effect is quite audible.

Any of the Regular Matrix quadraphonic systems works, including Dynaquad, Electro
Voice, and Sansui QS. The surround field works better without any separation-enhancing logic.

A basic (non-logic 10-40) SQ decoder can be used to play the Spheround recording.
Place the front speakers at ear height in the front. Put the left back speaker on the floor
centered behind the listener. Put the right back speaker at ceiling level directly above the left
back speaker.

The Octophonic circuit shown at right can be used with one stereo amplifier to
reproduce the effect. It also plays other Regular Matrix quadraphonic recordings without needing
separation-enhancing logic.

The SQ decoder tetrahedron and Octophonic systems can be combined. Place speakers
for the octophonic system. Then add another stereo amplifier connected to the left back and
right back SQ outputs, with the 9th and 10th speakers placed above and below the listener as in
the SQ item above.
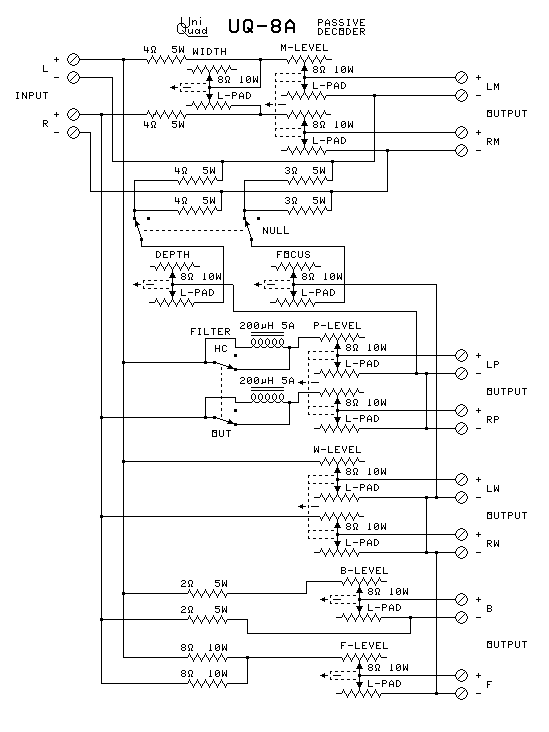 Setting up the Octophonic decoder:
- Place the speakers as follows:
| LM |
F |
RM |
| LW |
 |
RW |
| LP |
B |
RP |
- Play a mono recording.
- Turn Width control to maximum (CW), and the Focus and Depth controls to minimum (CCW).
- Turn up the W and P levels, and turn all of the others all the way down.
- Set the Filter control to OUT.
- Set the NULL switch to the NULL position (open).
- Adjust the balance control on the stereo for minimum sound from the speakers. Remember the
control position.
- Set the NULL switch to the normal position (closed).
- Adjust the level controls so all speakers except B are at the same level. Remember these control
positions.
- Set the FOCUS control so the W speakers are slightly quieter than the M speakers.
- Set the DEPTH control so the P speakers are about half the loudness of the M speakers.
- Turn all the level controls down except M.
- Turn the balance control all the way left.
- Adjust the WIDTH control so the RM speaker is slightly less than half the level of the LM
speaker.
- Turn up the B control until the B level is slightly more than half the LM level. Remember this
control position.
- Set the level controls back to the remembered positions.
- Set the balance control on the stereo back to the remembered position. If necessary, use
the NULL switch again as in steps 5 -- 7.
- If the SQ decoder is used for height in addition to the octophonic decoder, adjust the level
so it is audible when a high or low source is played, but not when other sources are played.
- The relative levels might need adjustment for different recordings.
WHY THE SURROUND FIELD MIC CLUSTER WORKS
This system is based on the relative levels and times of arrival of the signals from each of
the mics. They produce the proper sounds at the ears to recreate the original sounds.
Here is a table of relative levels, (dB in parentheses), and delays in microseconds recorded
on the tracks of the recording for different directions of sound sources.
Levels are portions of the sound energy. Capital letters show a larger sound level than
miniscule letters show.
| Dir | | Volume
L | delay
L |
|
Volume
R | delay
R | | Volume
S |
delay
S | | Direction | |
1st | 2nd | 3rd |
| 0 | | 0.87 (-1.2) | 0 | |
0.87 (-1.2) | 0 | | 0.10~ (-20) | 885 |
|
Dead Ahead | | L R | s | |
| 15 | | 0.79 (-2.0) | 191 | |
0.92 (-0.7) | 0 | | 0.13 (-18) | 950 |
|
| | R | L | s |
| 30 | | 0.71 (-3.0) | 369 | |
0.97 (-0.3) | 0 | | 0.26 (-12) | 951 |
|
| | R | L | S |
| 45 | | 0.61 (-4.3) | 521 | |
0.99 (-0.1) | 0 | | 0.38 (-8.4) | 886 |
|
| | R | L | S |
| 60 | | 0.50 (-6.0) | 639 | |
1.00 (0 dB) | 0 | | 0.50 (-6.0) | 762 |
|
Right Mic | | R | L S | |
| 75 | | 0.38 (-8.4) | 712 | |
0.99 (-0.1) | 0 | | 0.61 (-4.3) | 585 |
|
| | R | S | L |
| 90 | | 0.26 (-12) | 737 | |
0.97 (-0.3) | 0 | | 0.71 (-3.0) | 369 |
|
Dead Right | | R | S | L |
| 105 | | 0.13 (-18) | 712 | |
0.92 (-0.7) | 0 | | 0.79 (-2.0) | 127 |
|
| | R | S | l |
| 120 | | 0.10~ (-20) | 762 | |
0.87 (-1.2) | 123 | | 0.87 (-1.2) | 0 |
|
| | R S | l | |
| 135 | | 0.13 (-18) | 886 | |
0.79 (-2.0) | 365 | | 0.92 (-0.7) | 0 |
|
| | S | R | l |
| 150 | | 0.26 (-12) | 951 | |
0.71 (-3.0) | 582 | | 0.97 (-0.3) | 0 |
|
| | S | R | L |
| 165 | | 0.38 (-8.4) | 950 | |
0.61 (-4.3) | 759 | | 0.99 (-0.1) | 0 |
|
| | S | R | L |
| 180 | | 0.50 (-6.0) | 885 | |
0.50 (-6.0) | 885 | | 1.00 (0 dB) | 0 |
|
Dead Back Mic | | S | L R | |
| 195 | | 0.61 (-4.3) | 759 | |
0.38 (-8.4) | 950 | | 0.99 (-0.1) | 0 |
|
| | S | L | R |
| 210 | | 0.71 (-3.0) | 582 | |
0.26 (-12) | 951 | | 0.97 (-0.3) | 0 |
|
| | S | L | R |
| 225 | | 0.79 (-2.0) | 365 | |
0.13 (-18) | 886 | | 0.92 (-0.7) | 0 |
|
| | S | L | r |
| 240 | | 0.87 (-1.2) | 123 | |
0.10~ (-20) | 762 | | 0.87 (-1.2) | 0 |
|
| | L S | r | |
| 255 | | 0.92 (-0.7) | 0 | |
0.13 (-18) | 712 | | 0.79 (-2.0) | 127 |
|
| | L | S | r |
| 270 | | 0.97 (-0.3) | 0 | |
0.26 (-12) | 737 | | 0.71 (-3.0) | 369 |
|
Dead Left | | L | S | R |
| 285 | | 0.99 (-0.1) | 0 | |
0.38 (-8.4) | 712 | | 0.61 (-4.3) | 585 |
|
| | L | S | R |
| 300 | | 1.00 (0 dB) | 0 | |
0.50 (-6.0) | 639 | | 0.50 (-6.0) | 762 |
|
Left Mic | | L | R S | |
| 315 | | 0.99 (-0.1) | 0 | |
0.61 (-4.3) | 521 | | 0.38 (-8.4) | 886 |
|
| | L | R | S |
| 330 | | 0.97 (-0.3) | 0 | |
0.71 (-3.0) | 369 | | 0.26 (-12) | 951 |
|
| | L | R | S |
| 345 | | 0.92 (-0.7) | 0 | |
0.79 (-2.0) | 191 | | 0.13 (-18) | 950 |
|
| | L | R | s |
| 360 | | 0.87 (-1.2) | 0 | |
0.87 (-1.2) | 0 | | 0.10~ (-20) | 885 |
|
Dead Ahead | | L R | s | |
~ Varies with the amount of room spill leaking into the mic pointing directly away from
the sound.
The delays and the reduced volumes cause the ears to correctly determine the direction of
sound.
In addition, reflections of sounds from room surfaces come from different directions, and
activate the mics from the directions they come from. This further reinforces the perceived
direction of the sound. The sound recorded sounds quite real.
WHY THE OCTOPHONIC SPEAKER ARRAY WORKS
LOCATIONS OF THE SOUND IMAGES
LINKS: