Connecting a SPLIT CONSOLE:
- Use a short patching snake to connect the multitrack Playback Outputs to the mixer. Connect one cable in the short snake for each track to the leftmost channel strip Inputs on the mixer. Connect the other ends to the Playback Outputs on the multitrack in the same order.
- Use a box-end snake to connect the studio area to the mixer. This doubles as a patch panel for selecting the track each part is recorded on. Connect the Snake Positions to the channel strip Inputs to the right of the inputs used for the tape tracks on the mixer. Other than the snake connections needed for monitors, connect as many of the snake positions as will fit to remaining channel strips Inputs on the mixer.
- For enough studio source channel strips to equal the number of tracks on the multitrack recorder, connect the Direct Outputs on these strips to the rear-panel Inputs of the leftmost positions on the patchbay. Use a short snake to reduce noise.
- Configure those positions on the patchbay as Half-Normal.
- Connect the rear-panel Outputs of those positions of the patchbay to the Track Inputs on the multitrack recorder. Use a short snake to reduce noise.
- Connect each Submaster Bus Output on the mixer to a rear-panel Input on a patchbay position. Configure these patchbay positions as Parallel.
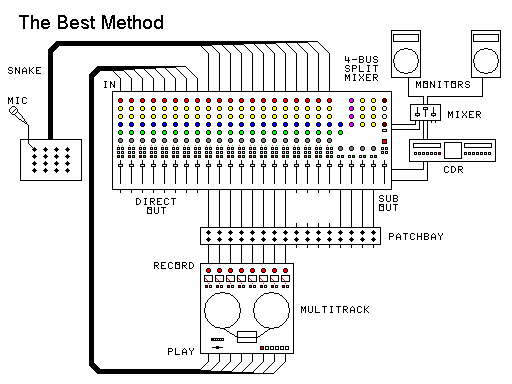
Split console wiring
Connecting an INLINE CONSOLE:
- Use a short patching snake to connect the multitrack Playback Outputs to the mixer. Connect the short snake cables to enough channel strip Tape Returns on the mixer. Connect the other ends to the Playback Outputs on the multitrack in the same order.
- Use a box-end snake to connect the studio area to the mixer. This doubles as a patch panel for selecting the track each part is recorded on. Connect the Snake Positions to the leftmost channel strip Source Inputs on the mixer (including the strips with tape return connections). Other than the snake connections needed for monitors, connect as many of the snake positions as will fit to remaining channel strips Inputs on the mixer.
- For enough studio source channel strips to equal the number of tracks on the multitrack recorder, connect the Direct Outputs on these strips to the rear-panel Inputs of the leftmost positions on the patchbay. Use a short snake to reduce noise.
- Configure those positions on the patchbay as Half-Normal.
- Connect the rear-panel Outputs of those positions of the patchbay to the Track Inputs on the multitrack recorder. Use a short snake to reduce noise.
- Connect each Submaster Bus Output on the mixer to a rear-panel Input on a patchbay position. Configure these patchbay positions as Parallel.
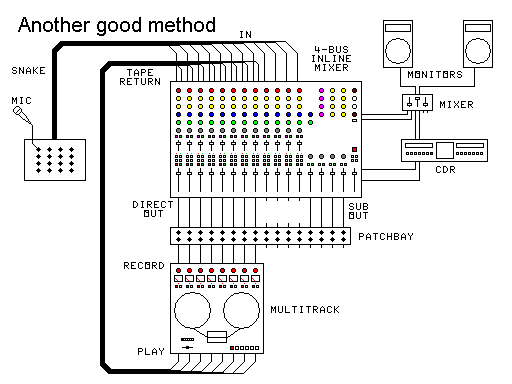
Inline console wiring
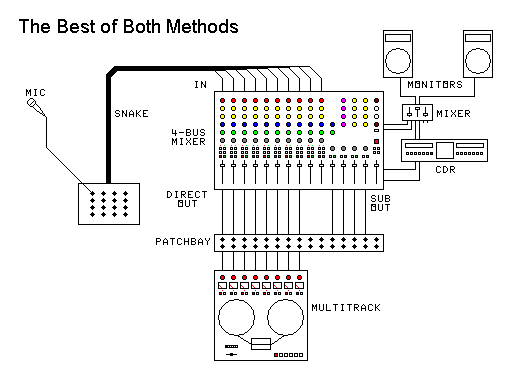
This is the SIMPLIFIED DIAGRAM used to represent either of the above types of mixers. It will be used in the sample uses below.
These simplified diagrams use the common parts of both types of mixers. The only real difference between the simplified diagram and your setup is that the number on each channel strip in the diagram will be different from the channel number on your mixer.
Tape Returns are not shown on the simplified diagrams in the rest of this page. In your mind, project the simplified diagrams onto the above diagram matching the type of your mixer.
USING THE PATCHBAY SETUP
Recording directly to tracks (enough tracks for the sources).
Use the leftmost channel strips to record up to as many sources as you have tracks for directly to the tracks.
(Use the above diagram)
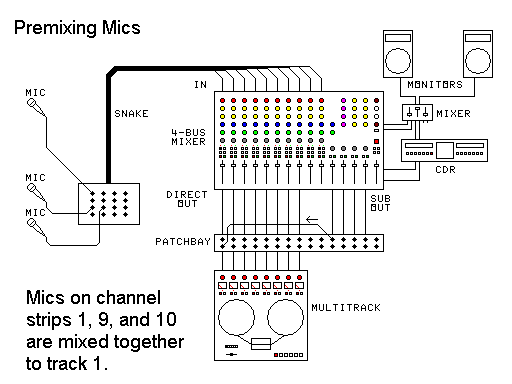
Recording more than one source to one track:
Here, you must submix before recording. Choose which sources are to be mixed together to the track:
- Put one of the sources for the track onto the channel strip for that track.
- Put the remaining sources on channel strips beyond the last strip on a recording track.
- Assign the strips to be mixed to the track to the one Submaster Bus on the mixer.
- On the patchbay, patch that Submaster Bus Output to the input for the track it is to be recorded on.
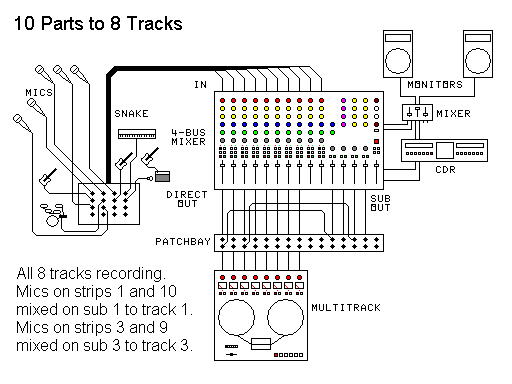
Recording more live sources than you have tracks:
Here, you must submix before recording. Choose which sources are to be mixed together to which tracks. For each mixed track:
- Put one of the sources for a track onto the channel strip for that track.
- Put the remaining sources on channel strips beyond the last strip with a track.
- Assign the strips to be mixed to this track to the same Submaster Bus on the mixer. Use a different Submaster for each mixed track.
- On the patchbay, patch that Submaster Bus Output to the input for the track it is to be recorded on.
Repeat the above for each mixed track, For single source tracks just use the channel strip for the track, with no patching.
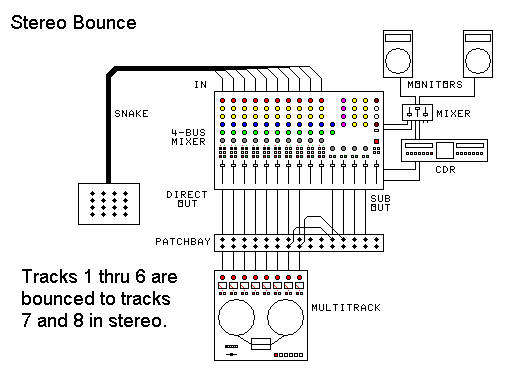
Bouncing tracks:
Here, you mix the tracks together onto one or two blank tracks. Choose which tracks are to be mixed together to which tracks. For each bounced track:
- Assign the Tape Returns to their mixer strips. On an inline console, flip the "TAPE" switch on the strip. On a split console, the tracks have their own channel strips.
- If doing a stereo bounce, you will need an odd Submaster Bus, and also the next even Submaster Bus. This makes the Panpots work right.
- Assign the strips to be bounced to the Submaster Bus (or pair of buses, for a stereo bounce) on the mixer.
- On the patchbay, patch the Submaster Bus Output(s) used to the input(s) for the track(s) the bounce is to be recorded on.
- On a stereo bounce, use the Panpots to pan the parts to their final stereo positions.