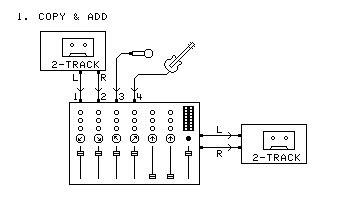
Minimum equipment required: Two 2-track recorders, Mixer
This technique can be done even if you do not have a multitrack recorder. Play the already completed tape through two mixer channels, panned hard left and hard right (or use a single stereo channel). Mix in the new parts, with all panning and effects included. Record the result on a fresh (blank and bulk erased) tape in the second recorder.
Advantages: Low equipment cost.
Disadvantages: Each added set of musicians adds the degradation of one generation-loss to all previously recorded
parts. Also, if anyone makes a mistake, all of the new parts added have to be redone.
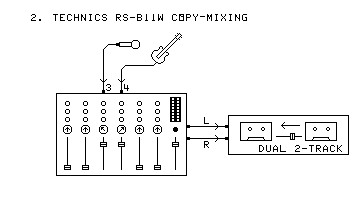
Minimum equipment required: Technics RS-B11W, Mixer
Mix the new parts together, with all panning and effects included. Feed the result into the recorder. Put your previous 2-track in the play side, and a blank tape in the record side. Put the recorder in copy mode on normal speed, and use its fader to set the level of the new parts in relation to the old.
Advantages: Low equipment cost.
Disadvantages: Each added set of musicians adds the degradation of one generation-loss to all previously
recorded parts. There is no control over levels of previous tracks. Also, if anyone makes a mistake, all of the
new parts added in the pass have to be redone.
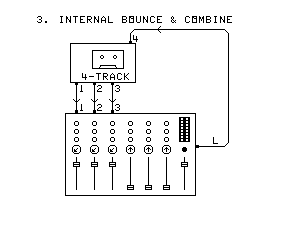
Minimum equipment required: Multitrack recorder, Mixer (internal or external to recorder)
Play the already completed tracks into the mixer. Mix them and record the result on an unused track.
Note: If needed, new parts can be mixed in at the same time.
Note: On a machine with more than 4 tracks, this can be done in stereo, using two destination tracks.
Advantages: Frees up tracks for more overdubs.
Disadvantages: All of the parts combined must have the same pan position in the final mix (except as noted
above).
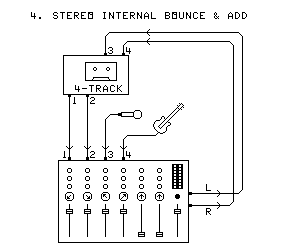
Minimum equipment required: Multitrack recorder, Mixer (internal or external to recorder)
Play the already completed tracks into the mixer. Mix them with the new parts (with all panning and effects included) and record the result in stereo on two unused tracks.
Advantages: Preserves stereo image of previous mixing.
Disadvantages: Each added set of musicians adds the degradation of one generation-loss to the previously
recorded parts. Also, if anyone makes a mistake, all of the new parts added during the bounce have to be redone.
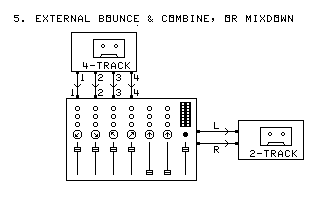
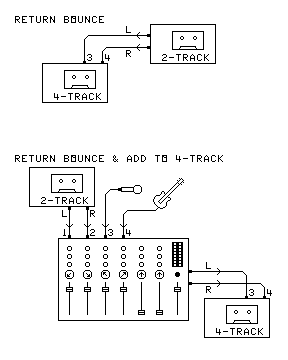
Minimum equipment required: Multitrack recorder, Mixer (internal or external to recorder), 2-track recorder
Put a fresh tape in the 2-track. Play the already completed tracks on the multitrack into the mixer. Mix them (including all effects and pan positions) and record the result in stereo on the 2-track. Then use one of the return methods listed next.
Note: This is also the procedure for making the final master tape (omit the return bounce).
Advantages: Frees up tracks for more overdubs. Preserves stereo image of previous mixing.
Disadvantages: This process adds the degradation of two generation-losses to the parts already recorded.
Return Methods:
-
Return Bounce:
Put a fresh tape in the multitrack. Play the 2-track, and record the stereo mix on it onto two tracks of the multitrack.
Advantages: Frees up tracks for more overdubs. Preserves stereo image of previous mixing.
Disadvantages: This process adds the degradation of two generation-losses to the parts on tape.
-
Return Bounce and Add:
Put a fresh tape in the multitrack. Play the stereo mix from the 2-track into the mixer. Mix this with the new parts (with all panning and effects included) and record the result in stereo on two tracks of the multitrack.
Advantages: Frees up tracks for more overdubs. Preserves stereo image of previous mixing. Allows adding parts.
Disadvantages: This process adds the degradation of one generation-losses to the parts on tape. Also, if anyone makes a mistake, all of the new parts added during the return bounce have to be redone.
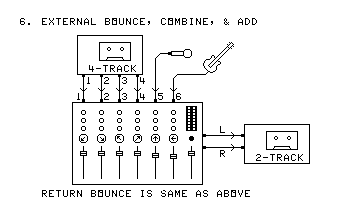
Minimum equipment required: Multitrack recorder, Mixer (internal or external to recorder), 2-track recorder
Put a fresh tape in the 2-track. Play the already completed tracks on the multitrack into the mixer. Mix them. Also mix in the new parts. Include all panning and effects and record the result in stereo on the 2-track. Then use one of the return methods listed above.
Advantages: Frees up tracks for more overdubs. Preserves stereo image of previous mixing.
Disadvantages: This process adds the degradation of two generation-losses to the parts on tape, and adds one
generation-loss to the added parts. Also, if anyone makes a mistake, all of the new parts added during the bounce
have to be redone.
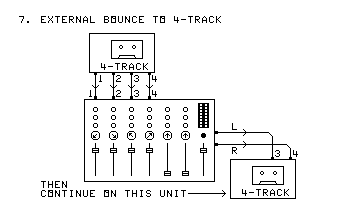
Minimum equipment required: Two Multitrack recorders, Mixer (internal to both recorders, or external)
Put a fresh tape in the second multitrack. Play the already completed tracks on the first multitrack into the mixer. Mix them and record the result in stereo on the second multitrack. Then continue your work on the second multitrack.
Note: If a second external bounce is needed, bounce to a fresh tape in the first multitrack, and continue working there.
Advantages: Frees up tracks for more overdubs. Preserves stereo image of previous mixing. Adds one less generation-loss than the regular external bounce method does.
Disadvantages: Needs two multitrack recorders. Adds the degradation of one generation-loss to the parts already
recorded.