ALL ABOUT PATCHBAYS
Patchbays are very simple, once you understand their purpose. They let you easily change
the way your recording studio is connected, and to easily restore your standard operating
methods just by removing all of the plugs from the patchbay. This means that the patchbay
must have some way of remembering what your standard operating methods are.
A standard patchbay is divided into a number of columns of pairs of jacks, each one
containing one patch point. Usually a patch point consists of an output from one device and
an input to another device. How they are connected depends on how you normally use your
studio. With this in mind, there are four different ways patch points can be connected.
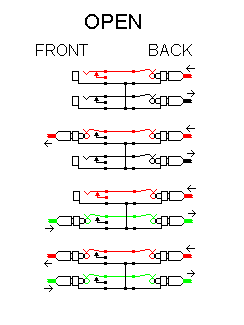
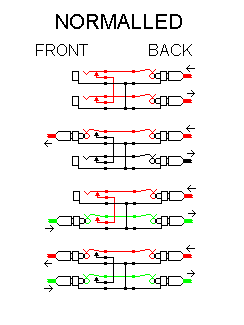
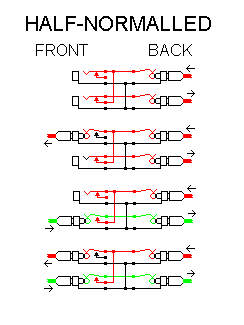
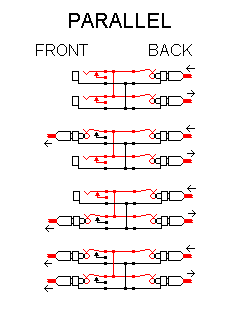
Notice that the following diagrams show all combinations of jacks being inserted or removed
from the front panel:
|
OPEN
The open configuration never makes a connection from the top jacks to the bottom
jacks. Notice how the two circuits are always kept separate.
This is useful for connecting a normally unused effect to the patchbay. The bottom
front panel jack becomes the send to the effect and the top jack becomes the return
from the effect.
Examples: effect boxes, isolated tape machines
|

|
|
NORMALLED
The normalled configuration makes a connection from the top jacks to the bottom
jacks whenever no plugs are inserted into either front panel jack. Notice how inserting
a plug in either front panel jack breaks the connection
between the top and bottom circuits.
This is useful for connecting a source that should not have more than one load, such
as a dynamic mic. The mic comes into the back of the top jacks and the feed to the preamp
is at the bottom. Inserting a plug in the top front jacks diverts the mic signal for use
elsewhere, while preventing the mic from being loaded down. Inserting a plug into the
bottom jack allows a different signal to feed the preamp.
By using both jacks, you can insert a mic-level effect between the mic and the
preamp.
Examples: microphones, high impedance outputs
|

|
|
HALF-NORMALLED
The half-normalled configuration makes a connection from the top jacks to the bottom
jacks whenever no plug is inserted into the bottom front panel jack. Notice how
inserting a plug in the bottom front panel jack breaks
the connection between the top and bottom circuits, but inserting a plug in the
top front panel jack does not.
This is useful for connecting a normal signal flow from one piece of equipment to
another, while allowing the connection to be tapped off of or replaced if needed.
Inserting a plug in the top front jacks taps the signal for use elsewhere while
letting the normal connection still pass signal. Inserting a plug into the bottom
jack allows substituting a different signal while removing the normal signal
flow.
By using both jacks, you can insert an effect into the signal path.
Examples: mixer to monitor amp, direct out to recorder in
|

|
|
PARALLEL
The parallel configuration always makes a connection from the top jacks to the bottom
jacks. Notice how the two circuits are kept together, and that both
front panel jacks are outputs.
This is useful for connecting an output, which is normally connected to one input,
to several different inputs at once. Both jacks can send the signal to places where it
is needed.
Examples: mixer submaster outputs, monitor feeds, tape duplication tap
points
|

|
|
Note that balanced patchbays have a second set of connections on each patch point for
the Ring terminal, which are wired identically to the connections for the Tip terminal
that are shown in the diagram. But before the TRS plug was developed, paired plugs were
made with one handle, so they fit into two adjacent patch points for balanced signals.
Some of these are still around.
Patchbays are now available that have switches on each patch point, to select whether
the patch point is Open, Normalled, Half-normalled, or Parallel. Usually the patchbay must
be removed from the rack to change the switches.
USING THE PATCHBAY
For most studio patching, two setups are used most often:
The first setup is the normal audio chain. For this setup, the output of each
component in an audio chain is brought to the rear input of one patch point. The
input of the next component in the chain is connected to that patch point's rear
output. The patch point is set up as Half-normalled. The normal connection is
maintained whenever plugs are not inserted into front jacks of the patch pair.
Inserting a plug in the upper front panel jack allows you to split the signal off
in two directions.
Inserting plugs in both front jacks allows you to insert another component in the
chain.
By inserting a cable in the front output jack of one patch point, and the front input
jack of the next patch point downstream, you can remove a component from the audio chain.
You can then connect cables to the remaining jacks of those patch points and use the
removed component somewhere else (nifty use!).
The second setup is the isolated component. Bring its output to the top jack on the
rear, and its input to the bottom jack on the rear of the same patch point. Set the patch
point up as Open. This component is disconnected until needed, but takes up only one patch
point, rather than the two that would otherwise be used.
Patchbays can make your studio life easier, by keeping you from having to reach around
behind racks to reconnect equipment frequently. They also make it super-easy to restore
your most-often used configuration. All you do is pull all of the patchcords out of the
front panel, and you are back to standard operation.
LINKS


