STEREO RECORDING
The simplest method is to connect a stereo recorder to the stereo outputs of the house mixer. Use the connections shown in the diagram, minus the ambience mics, and with a stereo recorder instead of a multitrack.
- ADVANTAGES:
- Only one mix.
- Only one console.
- Simplest connections.
- Only one sound engineer.
- DISADVANTAGES:
- The house mix is not usually the optimum mix for a recording.
- Acoustic parts emitting sound directly into the house will be underrepresented in the recording.
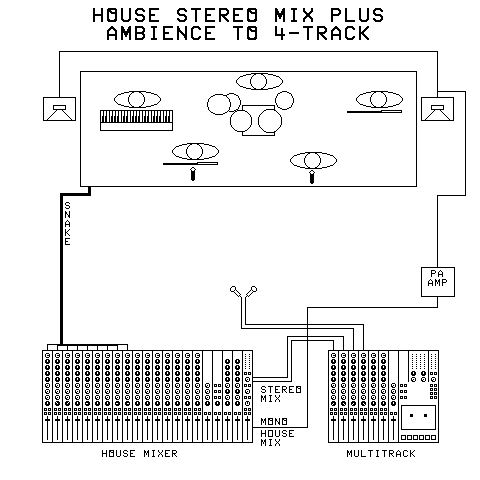
STEREO RECORDING WITH
AMBIENCE MICS TO 4-TRACK
This method uses a 4-track recorder, recording a stereo mix from the house mixer on two tracks, and a stereo or surround ambience pickup on the other two tracks.
- ADVANTAGES:
- Simple setup.
- Ambience pickup makes live recording sound more real.
- Only one console.
- Ambience pickup helps to fill in gaps in live mix.
- DISADVANTAGES:
- Two engineers needed.
- The house mix is still not usually the optimum mix for a recording.
- The acoustic parts may still be diminished.
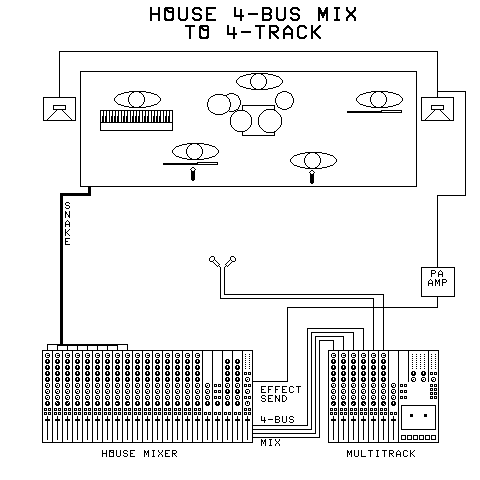
HOUSE MIXER BUS RECORDING
This is an ingenious method often used by the author to make a good multitrack recording while simultaneously mixing to the house. It uses the mixer's buses to feed the multitrack. Simultaneously, an after-fader effects send is used to make the house mix. This way, the multitrack mix can be made without being compromised by the need to have less of the acoustic instruments in the house mix. Those instruments can be turned down for the house with their channel strips' effect send controls. During the show, moving the channel faders then adjusts both settings as needed.
- ADVANTAGES:
- Only one engineer is needed.
- Only one console.
- An ambience pickup can be used on the multitrack if extra tracks are available.
- DISADVANTAGES:
- The needs of the house mix can still ruin the recording mixes.
- The engineer can get too busy to monitor the recording mixes.
- The number of buses on the house mixer may be insufficient.
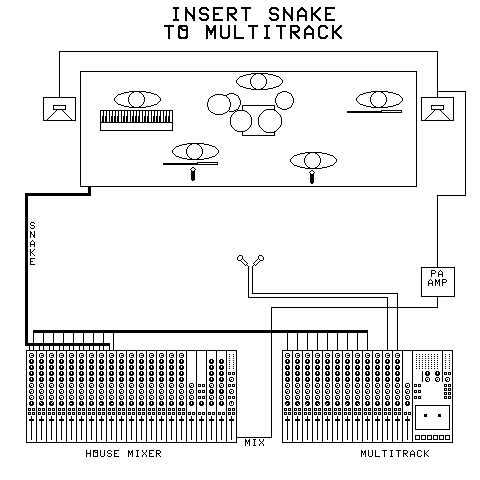
INSERT SNAKE RECORDING
This method requires that the house mixer have channel inserts, and a special snake that taps, and then returns, those channel inserts to the mixer. The signal goes in through the house board's inputs, and then is sent from the channel inserts of the house board to the recording mixer, while still continuing into the house mixer.
- ADVANTAGES:
- The number of buses on the house mixer does not limit the recording in any way.
- The house and recording processes are largely independent.
- An ambience pickup can be used.
- DISADVANTAGES:
- Any change in the trim controls on the house mixer changes the recording levels of those parts on the multitrack.
- Two engineers are needed, one for each mix.
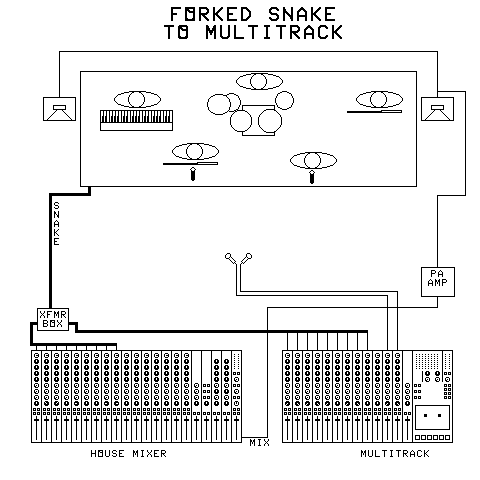
FORKED SNAKE RECORDING
This requires a special snake with a transformer coupling box, so that only one mixer is directly connected to mics and supplying phantom power to them. But a special box is available for existing snakes.
- ADVANTAGES:
- Other than mics and instruments, the two processes are completely separated from each other.
- An ambience pickup can be used.
- The number of buses on the house mixer does not limit the recording in any way.
- DISADVANTAGES:
- A special splitter box is needed for a built-in house snake.
- The splitter box must use transformers, so only one mixer is directly connected to mics and supplying phantom power to them.
- More expensive than the other methods.
- Could load down some sources too much.
ABOUT AMBIENCE PICKUPS
There are several kinds of ambient pickups. How the pickup is used depends on how many mics are used, and whether or not they get their own tracks on the multitrack:
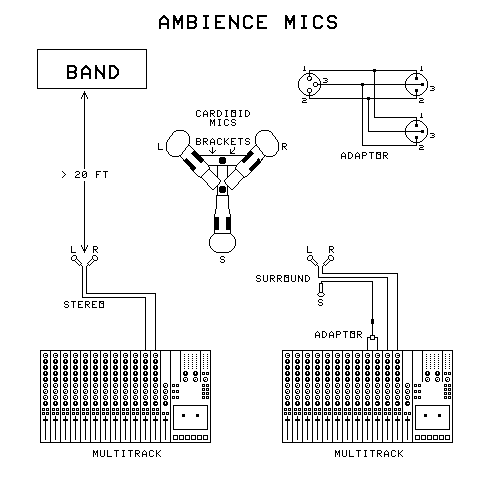
- ONE MIC ON ITS OWN TRACK - Aim the mic at the band or up, from a distance of at least 20 feet away. Mix down panned in a place where it expands the space.
- ONE MIC, MIXED WITH OTHER PARTS INTO A MIXED STEREO PAIR OF TRACKS - Aim the mic at the band, or up, from at least 20 feet away. Use the adaptor shown to mix opposite phases into the left and right tracks.
- TWO MICS, ON THEIR OWN TRACKS - Separate the mics by about 10 inches, and aim them outward at 45 degree angles to the band. At mixdown, mix the tracks panned hard left and hard right respectively.
- TWO MICS, MIXED WITH PARTS INTO A MIXED STEREO PAIR OF TRACKS - Mount the mics as in the previous setup. Mix the mics into the stereo pair panned hard left and hard right respectively.
- THREE MICS, ON A PAIR OF AMBIENCE TRACKS - Mount two mics as in the previous two setups. Mix those mics panned hard left and hard right to the tracks. Aim the third mic either away from the band, or straight up. Use the bracket pair shown. Use the adaptor shown in the diagram to mix opposite phases of the third mic into the left and right tracks. At mixdown, mix the tracks panned hard left and hard right respectively.
- THREE MICS, MIXED WITH OTHER PARTS INTO A MIXED STEREO PAIR OF TRACKS - Mount the mics as in the previous setup. Mix the mics into the stereo pair as in the previous setup.
Note: Mics using the adaptor shown will appear behind the listener in the mix.
- ADVANTAGES:
- When done correctly this adds realism to the recording.
- DISADVANTAGES:
- It may be hard to keep the audience from disturbing the mics, unless the stand is in an isolated area, or the mics are hung from the ceiling.
- Adding too much of the ambient pickup can muddy the mix.
- A rowdy audience cannot be separated from the ambience created by the band and the room.
