THE QUINTINSHILL RAIL DISASTER
Quintinshill was the worst train crash not caused by overloading a train, a runaway train, or a disaster
starting elsewhere and falling upon the trains involved. This is a new look at this 5/22/1915 crash and
its causes.
Glossary of railway terms
THE CRASH
The setting:
- Quintinshill was a block post with a simple layout just north of Gretna Scotland on the
Caledonian Railway. A two-track main line passes through it, and there are two loop tracks to hold
trains while faster trains pass them. A crossover also exists to transfer trains from the tracks for one
direction to the tracks for the other direction. The next block post north of Quintinshill was
Kirkpatrick, and the next block post south was Gretna Junction (Gretna JCT). The signal box has now been
removed and the layout is remotely controlled.
- Note that this was during the first year of World War I, and that the government had
temporarily nationalized the rail systems. Government had also issued special regulations giving priority
to military trains over all other trains.
- Complicit in this disaster was the fact that the change of shift from one signalman to
another was done at the wrong time and in an unorthodox manner that broke the rules.
Five trains were involved - but the block post has room for only four
trains:
- The 4:50 down goods train from Carlisle
- The 6:17 down local train from Carlisle
- An up empty coal train
- An up troop train from Larbert
- The 6:05 down Scotch Express for Glasgow, running half an hour late
- The 5:50 down Scotch Express for Edinburgh, also half an hour late, passed through safely
just before the crash.
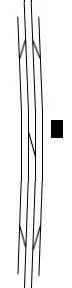 The Quintinshill layout - North is up.
The signal box is the black rectangle. The tracks are (left to right):
- Down Loop - Down Main - Up Main - Up Loop
There are trap points at the ends of the loop tracks to keep runaway wagons off the main
lines.
The order in which things happened:
- The 4:50 down goods train arrived, and was switched into the down loop.
- The empty up coal train arrived and was held until the local train arrived.
- The 6:17 down local train arrived, and was backed through the crossover onto the up main line.
- The empty up coal train was switched into the up loop.
- The signalmen changed shift late.
- The 5:50 down Scotch Express for Edinburgh, passed through safely on the down main line.
- The up troop train arrived and crashed head-on into the stationary local train on the same track.
The troop train engine was deflected and hit the empty coal train.
The heavy engine of the local train was driven back 40 yards and derailed.
The tender of the local train broke its couplings and was thrown onto the down main line.
Detached from the tender, the local train coaches rolled on the track away from the crash.
The local coaches stopped when the gradient slackened to the point where friction stopped
them.
A coupling broke, and the troop train baggage wagons also rolled away from the crash.
The wooden troop train coaches telescoped, with the tender across the down line.
A brakesman stopped the runaway baggage wagons to keep them from rolling back into the
wreckage.
- The 6:05 down Scotch Express for Glasgow crashed into the tender, wreckage, and survivors already on the
down main line.
The express train's pilot engine shoved the troop train's tender completely through some
wagons on the goods train.
- Escaping illuminating gas and spilled burning coal set most of the wreck on fire.
THE ORIGINAL INVESTIGATION
Investigators interviewed all pertinent witnesses. Colonel E. Druitt issued
the final report of the Board of Trade. The following facts are part of the report:
- The actions of signalmen Meakin and Tinsley and their unorthodox transfer of duty were greatly
contributory to the accident:
Meakin and Tinsley had an arrangement that, when the local was going to stop at Quintinshill because
the expresses were late, Tinsley would ride down on it from Gretna instead of walking. This would make
Tinsley 15 to 30 minutes late for duty.
Meakin wrote the train movements after 6:00 AM on a piece of paper, instead of putting them in the
Train Register.
Tinsley then copied the entries into the Train Register, making it appear that he had come on duty
on time.
- Meakin did not put the lever collars (intended to prevent forgetting the local train) on the up signal
levers. These would have prevented the signalman from pulling the signals to green for the troop train.
- Fireman Hutchinson of the local train was required by rule to go to the signal box because his train
was stopped on a main line. He was required to check that his train was protected with lever collars,
and then sign the Train Register. He did not check to see if the lever collars were used.
- Tinsley admitted that he had forgotten that the 6:17 down local train was standing on the up line.
Meakin and Tinsley were sentenced to jail time for their acts of manslaughter.
RECONSTRUCTING THE TRAIN REGISTER AND THE PIECE OF PAPER
The Train Register is the book in which a signalman keeps track of each train he
handles:
- The time of each event involving that train.
- By noting which entries are already filled in, he knows where the train is.
- Only one train with incomplete entries should be on any one track.
Each train is supposed to have each of the following events recorded in the Train
Register:
For the Rear Section - the section of track approaching the station or block post
- Trn Offr - Train offered for entry into the section
- Trn Acc - Train accepted into the section by this block post
- Trn On - Train has entered the section of track between block posts
- Trn Arr - Train has arrived at this station or block post
- Out Sec - Train has left the section of track between block posts
For the Advance Section - the section of track leaving the station or block post
- Trn Offr - Train offered for entry into the section
- Trn Acc - Train accepted into the section by next block post signalman
- Trn On - Train has entered the section of track between block posts
- Trn Dep - Train has left this station or block post
- Out Sec - Train has left the section of track between block posts
Because the original Train Register pages are not included in the report by Col. Druitt and
are not available elsewhere, the page author has reconstructed the relevant parts of them from the evidence
contained in the
references (Rolt Druitt) .
The reconstructed Train Register:
A few columns are combined for fit on a web page. The original used the left and right facing
pages in the book for recording the down and up trains respectively.
| TRAIN REGISTER FOR Quintinshill on Saturday the 22 day of 5 month of
1915 |
Train
Descrip. | DOWN |
T
r
a
c
k |
UP | Remarks |
Rear Section:
Gretna JCT | Advance Section:
Kirkpatrick |
Rear Section:
Kirkpatrick | Advance Section:
Gretna JCT |
Trn
Offr | Trn
Acc | Trn
On | Trn
Arr | Out
Sec |
Trn
Offr | Trn
Acc | Trn
On | Trn
Dep | Out
Sec |
Trn
Offr | Trn
Acc | Trn
On | Trn
Arr | Out
Sec |
Trn
Offr | Trn
Acc | Trn
On | Trn
Dep | Out
Sec |
| 450 D Goods |
?:?? | ?:?? | ?:?? | 6:15 | 6:20 |
| | | | |
DL |
| | | | |
| | | | |
|
| Empty U Coal |
| | | | |
| | | | |
UL |
6:17 | 6:17 | 6:25 | 6:28 | 6:34 |
| | | | |
|
| 6:17 D Local |
6:20 | 6:20 | 6:28 | 6:30 | 6:33 |
| | | | |
UM |
| | | | |
| | | | |
6:38 Hutchinson |
| 5:50 D Expr |
6:33 | 6:33 | 6:36 | 6:38 | 6:38 |
6:33 | 6:33 | 6:38 | 6:38 | 6:42 |
DM |
| | | | |
| | | | |
|
| Shift Change |
| | | 6:34 | |
| | 6:36 | | |
|
| | | 6:34 | |
| | 6:36 | | |
6:00 Tinsley |
| U Troop Tr |
| | | | |
| | | | |
UM |
6:42 | 6:43 | 6:47 | 6:49 | |
6:47 | 6:47 | | | |
Gretna rang once |
| 6:05 D Expr |
6:46 | 6:46 | 6:49 | 6:50 | |
6:46 | 6:46 | | | |
DM |
| | | | |
| | | | |
|
| Obst Danger
|
6:53 | | | | |
| | | | |
UD |
6:53 | | | | |
| | | | |
Obst Danger |
| Ambulance Train |
?:?? | ?:?? | ?:?? | 8:10 | |
| | | | |
D |
| | | | |
| | | | |
|
| |
| Meaken |
| Meaken on paper |
| Tinsley |
| unknown |
| ?:?? = time unknown |
The reconstructed list on the piece of paper:
- ?:?? Gretna JCT offered down 4:50 goods. Accepted.
- ?:?? Gretna JCT belled 'train on line' for 4:50 down goods. Ack.
- 6:15 Down 4:50 goods arrived, down loop.
- 6:17 Kirkpatrick offered up empty coal train. Accepted.
- 6:17 Offered up empty coal train to Gretna JCT. Can't take it.
- 6:20 Belled 'out of section' to Gretna JCT for down 4:50 goods.
- 6:20 Gretna JCT offered down 6:17 local. Accepted.
- 6:25 Kirkpatrick belled 'train on line' for up empty coal train. Ack.
- 6:28 Up empty coal train arrived, held at home.
- 6:28 Gretna JCT belled 'train on line' for down 6:17 local. Ack.
- 6:30 Down 6:17 local arrived, cross to up main.
- 6:33 Belled 'out of section' to Gretna JCT for down 6:17 local.
- 6:33 Signal up empty coal train into up loop.
- 6:33 Gretna JCT offered down 5:50 Edinburgh express. Accepted.
- 6:33 Offered down 5:50 Edinburgh Express to Kirkpatrick. Accepted.
|
?:?? means the time is not known to the page author.
INVESTIGATING THE FACTS
Factors contributing to the crash:
- The unorthodox transfer of duty from Meakin to Tinsley caused the signalmen to be busy doing things
that took their attention away from safely passing the trains.
- The lateness of the Scotch expresses from London put too much traffic in the same area at the same
time.
- The sudden appearance of a priority troop train further strained the traffic handling ability of the
tracks in the area.
- The rules requiring the priority handling of military trains above all others, and the handling of
express trains above all others except military trains, caused a traffic jam, because there were not
enough places to store the local and freight trains to let them pass. And under the wartime rules,
signalmen received demerits if they held up a troop train or an express to pass a slow train.
- Gretna JCT, Quintinshill, and Kirkpatrick all had problems finding places to hide the slow trains.
- Meakin switched the local to the up main line because he didn't know of the troop train yet. His plan
was to pass the two Scotch expresses, then let the local go before passing any up traffic.
- The crossover was directly in front of the signal box, but also extended 55 yards to the left (in the
down direction) Druitt. The local backed up to a point behind the
crossover, to clear it for other trains to pass. This means that the local was not stopped directly in
front of the box, but was 65 yards to the left of the signal box front
windows Rolt at its closest. 65 yards is about 2/3 of a football
field.
- Tinsley got off the local as soon as it was even with the signal box. He then crossed the tracks to
get to the box. The backing of the local onto the up main line happened behind his back. As soon as
Tinsley had crossed the tracks, the empty coal train moved into the siding and hid the local from him
as he walked to the box.
- Meakin mentioned the local to Tinsley, but did not elaborate.
- Tinsley did not know or understand what Meakin's plan was.
- Just before Tinsley took over the box, Meakin did a lot of belling to other signal boxes (the last
four items on the piece of paper). Tinsley probably thought some of that was letting the local go
forward.
- The troop train's existence became known to both signalmen before Tinsley took over the box.
- Because Tinsley had not yet completed the entries in the Train Register, he did not know where the
local train was at the time of the accident.
- The wagons of the empty coal train were tall enough (and the signal box was short enough) that Tinsley
could not see the local train over the empty coal wagons, or thought the coaches were part of the goods
train.
Other pertinent facts:
- In his book Red for Danger, Rolt seems to have confused the two Scotch expresses. He reports the
time that Tinsley pulled off the signals for the express and gave the 'entering section' signal to
Kirkpatrick as 6:38 Rolt. But that time belongs to the Scotch express to
Edinburgh, which passed safely through Quintinshill before the crash. The Scotch express to Glasgow was not
even offered to Tinsley until 6:46. And the fact that he sent the 'entering section' signal means the train
was passing through the block post then, 12 minutes before the crash.
- Two kinds of coal wagons are used on UK railways. The low style is used for a small load, or if the load
has to be tipped into a ship's hold or a coal repository. The high style cannot be tipped, but can carry over
twice the amount of coal.
- The short coal wagons would be placed at the front of the train so the engine crew can see them.
- Wartime regulations required that military trains not be stopped for any other trains for any
reason.
- Although neither Meakin nor Tinsley admitted sending the 'train out of section' signal to Kirkpatrick,
Thomas Sawyers, the signalman at Kirkpatrick, says he received it at 6:34.
- Tinsley said he found the block indicator showing 'normal' ('line clear') when he went on duty.
- The Gretna signalman sent an 'attention' single bell beat to Quintinshill just before receiving the
obstruction danger signal, because he had heard nothing more about the already offered and accepted troop
train.
- Tinsley said that the signalmen did not normally walk to the window to look at the lines. The block
equipment and the levers were not near the window.
Note: Most signal boxes had the lever frame in the middle, with the rail layout diagram and the block
instruments on the back wall. It would have been necessary to walk around the lever frame to get a good
look out the windows.
The block instruments were too large to place below the windows. They would have obstructed the
view from the windows.
- Tinsley hedged when he was asked if the empty coal train might have prevented him from seeing the up
line, and when asked if the empty coal train might have hidden the local train from him. He inexplicably
answered, "A wee bit," to both questions Druitt.
Possible reasons include:
- He hadn't looked out the window, so he did not know whether or not the empty coal train hid the local
train from the signal box.
- He might have been under orders from the Caledonian Railway company to not blame the inadequate signal
box heights. Rebuilding all of the signal boxes due to the taller trains now in use would have become a
considerable new expense.
- He was thinking in terms of keeping his job, not being sent to prison for manslaughter. Blaming the
signal box height might get him fired for sure.
Analyzing existing photos of trains, the signal box, and the crash:
|
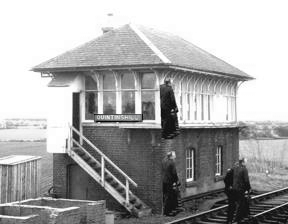
The first photo is a photo of the Quintinshill signal box. A railfan interested in the case (who does not
want to be identified on this page) sent it to me. A man is walking on the track in front of the box. I
copied the image of the man and shrunk it slightly to compensate for the increased distance from the camera,
using the tallest possible case. Then I put two copies of the result next to the signal box, as though one
was on the first floor, and one was on the second floor. I assumed that the lighter rectangles around the
box between the floors are the floor supports.
The idea is to show the height of the eyes of the signalman on the second floor. This shows that the
eyes of the signalman would be very near the tops of the windows, showing the best case for how much the
signalman could see from the box.
Some of these photos are larger, but are shown with reduced size on this page for fit. For a better view
of any picture on this page, right click the picture and choose "view image". Then use ctrl +
to magnify it. Use BACK to return here (If your browser makes this page too large when you come BACK to it,
use ctrl 0 to get the proper size again.)
|
|
|
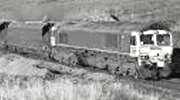
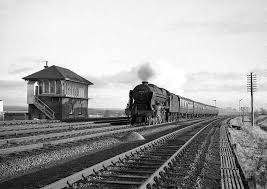 The next photo is of the Quintinshill signal box and a passing train. Note how large the train is,
compared to the signal box. It would completely hide any train beyond it from the signalman. The signal
box is too short for safety.
The next photo is of the Quintinshill signal box and a passing train. Note how large the train is,
compared to the signal box. It would completely hide any train beyond it from the signalman. The signal
box is too short for safety.
The train shown is a passenger train. But note that the coaches are the height of the high style of coal
wagons seen in the photo of a coal train on the far right. The rounded tops of cars are necessitated
by British rail tunnels.
These photos were sent by the same railfan.
|
|
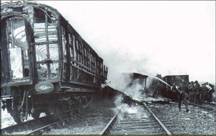
The photo on the near right is the public domain photo wpd
of the Quintinshill crash on 5/22/1915. An enlarged and contrast-enhanced portion of it appears below.
Note that four rail vehicles are visible.
A cropped version of this photo appears in
Red for Danger Rolt that shows only the burning coach.
Nothing to the right of it is shown.
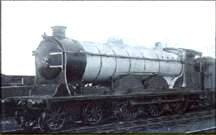
The engine in the far right photo is the engine of the local, taken years before the crash. Note the odd
roofline of the cab.
|
|
|
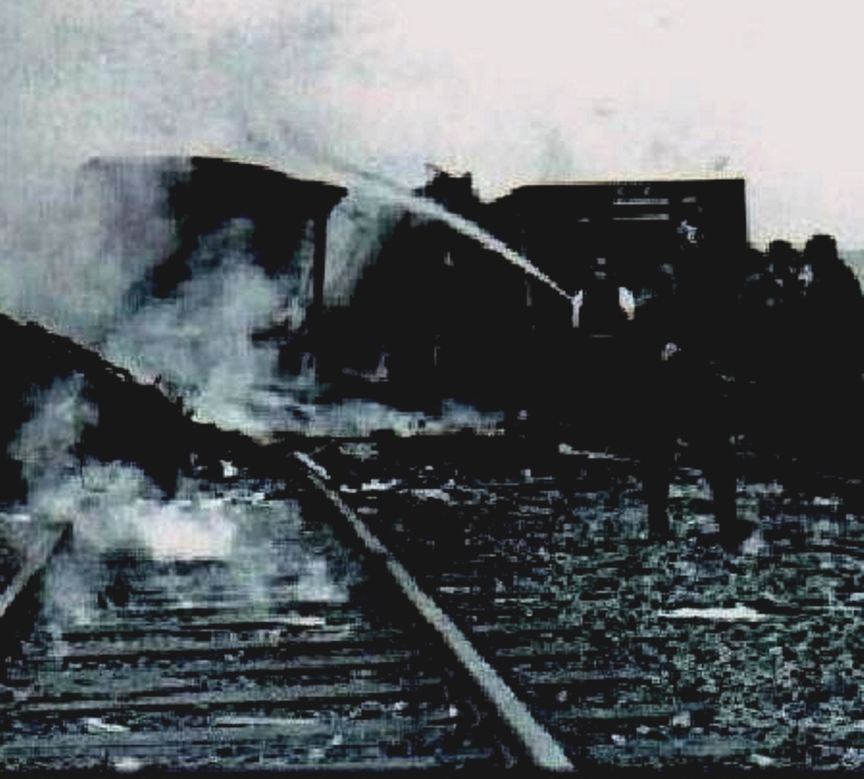 Four objects, plus some wreckage, appear in the above wreck photo, left to right:
- A burning express coach the firemen are putting out
- The engine of the local
- A high-style coal wagon
- A low-style open-top coal wagon
The three vehicles on the right in the above photo are in the excerpted photo on the right.
Note that the leftmost vehicle in the excerpted photo has the same cab design (including the funny
curved roof and the corner posts) as the engine of the local. Therefore, it is the engine of the local.
According to witnesses, this engine ended up in the shown location after being pushed 40 yards by
the first collision.
The next vehicle to the right (behind the low coal wagon) is a high coal wagon. It is similar to the
coal wagons in the coal train shown in an image above. The page author first thought this was the signal
box roof. But the shape is wrong, and the signal box was more than 120 yards away from the photographer.*
Because the tracks curve to the left, the signal box should be mostly hidden from the photo by the engine
of the local train.
The burning coach is on the down main line.
The track in the foreground is the up main line.
The coal wagons are on the up loop line.
* This distance includes the 65 yards the local engine stopped to the left of the box, plus
the 40 yards the local engine was pushed by the collision, plus the distance from the engine to the
photographer.
|
Too many trains at Quintinshill in too little time:
There were too many trains and too many rules prohibiting the stopping of important trains
that contributed to this disaster. This was an unusual occurrence:
- If Tinsley had been on time, he would have controlled all of the train movements on this list, and the
accident probably would not have happened.
- If Meakin had continued controlling the trains until Tinsley had finished copying the train register
entries, then Tinsley would have known the positions of the trains, and the accident would not have
happened.
- The 4:50 down goods train from Carlisle was not expected to be stopped at Quintinshill, but stations
ahead had no place to put it, and it was normally expected to come after the express trains. But the
expresses were half an hour late, and the Gretna JCT signalman let it go ahead of them.
- The 6:17 down local train from Carlyle would have been dispatched after the two express trains had
passed. But because the express trains were late, the local was dispatched before them because it had to
make a connection at Beattock. Because the goods train was already in the down loop, the local was
switched over to the up main line.
- The up empty coal train was usually stopped at Gretna JCT, so it was not expected to have to stop at
Quintinshill. But Gretna JCT didn't have any place to put it, so it had to wait at Quintinshill in the up
loop.
Now there are already too many stopped trains at Quintinshill. This means that traffic can be passed in
only one direction at a time, and that the local train would have to be moved to pass any up traffic.
Meakin's plan was to pass the two expresses on the down main line, and then let the local go forward.
- The up troop train from Larbert was totally unexpected. And it has priority over all other trains. Meakin
still planned to run the expresses through first, then release the local, and finally pass the troop train.
He probably would have used as an excuse for not immediately passing the troop train the short notice he had
of its existence and not enough time to get rid of the trains in its way. The troop train driver could
corroborate this, because he would see all of the stopped trains.
Meakin had possibly planned to accept the troop train under the 'line clear, but station blocked' signal,
and then stop it with his home signal until the local train was clear of the crossover. This would gain him
time to get rid of the other trains.
- At this point, Tinsley took over the box. He had only partial knowledge on where all of the trains were
because he had not yet copied all of the train movements written down by Meakin into the Train Register.
- Because Tinsley had conflicting information about the whereabouts of the local train, he forgot it when
he accepted the troop train. He might have thought that Meakin had done something else with it.
There were too many trains in the area for the stations involved to handle:
- The 4:50 down goods had no place to go after Quintinshill where it could be shunted.
- Gretna had no place to put the up empty coal train.
- The up troop train was an unscheduled special.
- The local was dispatched out of order.
The local train was probably hidden from Tinsley.
- In the signal box and train photo, the train is tall enough to hide the signal box windows.
- The signal box was too short for the signalman to see anything else behind a tall train.
- The empty coal wagons were probably tall enough to cover the signal box windows.
- The local train stopped about 65 yards to the left of the signal box (direction is as viewed from
inside the box). It had to clear the crossover so the point lever could be moved.
- The empty coal train probably hid the local from the signalman, or made it look to be part of the
goods train.
- The fact that the coal train was probably tall enough to hide all other trains from the signalmen
conflicts with the statement of Colonel Druitt, as recorded in
Red for Danger Rolt:
"That they had overlooked the presence of a train standing within a few yards of
the box in broad daylight could only be explained by the fact that they had been preoccupied in
discussing the news of the day with the two brakesmen who should never have been permitted to remain
in the box and, where Tinsley was concerned, in copying out the false train entries from Meakin's
paper."
The photographs and other evidence show this statement to be in error. The local was not in front
of the box, but about 65 yards to the left of it. And the empty coal train probably hid the local
from the view from the box. Druitt was probably thinking of the low coal wagons. But even the low coal
wagons would have hidden the bottom parts of the local train and the goods train. Tinsley might have
thought they were both parts of the same train.
Since the wagons in front of the signal box had been consumed by the fire, only the consist
document of the coal train (the list of vehicles in the train and their contents) could tell what kind
of wagons they were. The consists of the three trains that collided are in the
report Druitt. But the consist of the coal train is not in the
report, so the page author could not obtain it. Druitt may not have had it either. This consist might
have been destroyed by the fire. (Note that the consist of the good train is also not in the report,
so Druitt might have thought the consists of these trains were not important to the investigation.)
Claims that this was sabotage against the war effort are untrue. These facts are
evident:
- These claims were not made at the time of the crash. They appeared years later in books.
- If either man had deliberately caused the crash, he would have left the vicinity before authorities
arrived.
- Tinsley was in total mental shock after the accident. He was so unable to operate the signal box that
Meakin resumed operation of the box. A saboteur would not have had such a reaction.
- Meakin was working hard to save lives and protect the line from other traffic. A saboteur would not
have had the conscience to do this.
- There was a short investigation at the time, but nothing was found that indicated any connection to
Central Powers infiltration.
- The probability that the crash was an accident, rather than a conspiracy, is evident from the various
pieces of evidence. Most of it is evidence of carelessness and complacency, not conspiracy.
Putting it all together
The following facts are evident:
- The local train was probably hidden from Tinsley.
In the signal box and train photo, the train is tall enough to hide the signal box windows.
The signal box was too short for the signalman to see anything else behind a tall train.
The empty coal wagons were probably tall enough to cover the signal box windows.
The local train stopped about 65 yards to the left of the signal box (direction is as viewed from
inside the box). It had to clear the crossover so the point lever could be moved.
The empty coal train probably hid the local from the signalman, or made it look to be part of the
goods train.
The fact that the coal train was probably tall enough to hide all other trains from the signalmen
conflicts with the statement of Colonel Druitt, as recorded in
Red for Danger Rolt:
- Druitt's statement is:
"That they had overlooked the presence of a train standing within a few yards of
the box in broad daylight could only be explained by the fact that they had been preoccupied in
discussing the news of the day with the two brakesmen who should never have been permitted to remain
in the box and, where Tinsley was concerned, in copying out the false train entries from Meakin's
paper."
- The photographs and other evidence show this statement to be in error. The local was not in front
of the box, but about 65 yards to the left of it. And the empty coal train probably hid the local
from the view from the box. Druitt was probably thinking of the low coal wagons. But even the low coal
wagons would have hidden the bottom parts of the local train and the goods train. Tinsley might have
thought they were both parts of the same train.
- Since the wagons in front of the signal box had been consumed by the fire, only the consist
document of the coal train (the list of vehicles in the train) could tell what kind of wagons they
were. But the consist of the coal train is not in the
report Druitt, so the page author could not obtain it. Druitt may
not have had it either. The consist might have been destroyed by the fire.
- Tinsley got off the local before it backed onto the up main line. He says he saw what Meakin did with
it.
- Meakin had not placed the lever collars on the up main signal levers to protect the local train. Thus,
Tinsley had no reminder that he could not pass a train on the up main line.
- Just before Tinsley took over the box, Meakin did a lot of belling (the last four items on the piece of
paper). Tinsley probably thought some of that was letting the local go forward.
- Tinsley said he found the block indicator for the up main line from Kirkpatrick showing 'normal' ('line
clear'). This made him think the down local was no longer on the up main line.
- Tinsley knew Hutchinson signed the Train Register. He had ridden with Hutchinson on the down local.
- Tinsley was too busy copying the entries from the piece of paper into the train register to ask
Hutchinson where his train was.
- Tinsley had not yet copied the entries for the local into the Train Register when he accepted the troop
train. Thus, he did not know that the local was still on the up main line.
The reconstructed sequence:
- The 4:50 down goods train arrived, and was switched into the down loop.
- The empty up coal train arrived and was held until the local train arrived.
- The 6:17 down local train arrived, and was backed through the crossover onto the up main line.
- Meakin had not placed the lever collars on the up main signal levers to protect the local train.
- The empty up coal train was switched into the up loop.
- The signalmen changed shift late.
- Someone changed the up line block indicator back to 'line clear'. Who did it is not known.
- The 5:50 down Scotch Express for Edinburgh, passed through safely on the down main line.
- Tinsley had conflicting clues of whether or not the down local was still on the up main line:
He had seen the down local backing onto the up main line.
Hutchinson signing the Train Register was evidence the train was there.
The down local train was probably invisible to him, hidden by the up empty coal train.
Even if it was not, the coal train hid enough of it that the rest of it might have looked to be a
continuation of the goods train.
Meakin had not put the lever collars on the up main signal levers to protect the local.
Meakin had done a lot of belling just before Tinsley took over the box, meaning the local
might have already left (or was waiting to pick up Hutchinson).
The up line block indicator to Kirkpatrick was set to line clear as Tinsley found it.
Tinsley had not finished copying the entries into the Train Register, so he did not know
what happened to the down local.
The requirement that troop trains not be stopped may have led Tinsley to believe that, after
receiving notice of the troop train, Meakin had moved or released the local train.
- Tinsley accepted the 6:05 down Scotch Express for Edinburgh and the up troop train from Larbert.
- The up troop train arrived and crashed head-on into the stationary local train on the same track.
The troop train engine was deflected and hit the empty coal train.
The engine of the local train was driven back 40 yards and derailed.
The tender of the local train broke its couplings and was thrown onto the down main line.
Detached from the tender, the local train coaches rolled on the track away from the crash.
The local coaches stopped when the gradient slackened to the point where friction stopped
them.
A coupling broke, and the troop train baggage wagons also rolled away from the crash.
The wooden troop train coaches telescoped, with the tender across the down line.
A brakesman stopped the runaway baggage wagons to keep them from rolling back into the
wreckage.
- The 6:05 down Scotch Express for Glasgow crashed into the tender, wreckage, and survivors already on the
down main line.
The express train's pilot engine shoved the troop train's tender completely through some
wagons on the goods train.
- Escaping illuminating gas and spilled burning coal set most of the wreck on fire.
The page author's conclusions:
The page author has inferred the following as the most likely explanations of the crash:
- Point 1: The railroad was overloaded in the area of Quintinshill on the morning of the
accident.
- There were two extra trains.
- Other trains arrived at times other than their scheduled times.
- There were more trains than there were tracks to put them on.
- Point 2: The rules required shunting slow trains to avoid stopping troop and express trains.
- There were too many slow trains ahead of the priority trains.
- There were not enough places to shunt them safely.
- An extra priority train was given to the signalmen with very short notice.
- Point 3: The signalmen did not have the needed information in time to form a safe plan.
- Meakin didn't know the troop train existed at the times he shunted slow trains.
- Thus, Meakin's original plan to handle slow trains did not include the troop train.
- When they found out about the troop train, it was too late to do anything about it.
- Point 4: The signal box was not tall enough.
- Trains with full height coaches and wagons were taller than the height of the signal
box windows.
- If the signal box had been built tall enough, the signalmen could have seen all of the
trains.
- The empty coal train probably hid the local from Tinsley.
- If the coal train did not completely hide the local, Tinsley might have thought the
local's coach tops were a continuation of the goods train.
- Point 5: The unorthodox shift change confused the signalmen.
- If Tinsley has arrived on time, he would have controlled all of the movements in the above
Train Register, and the accident would not have happened.
- If Tinsley had copied the entries before taking over the box, he would have known where the
trains were, and no accident would have happened.
- Because he had not yet finished copying the entries into the Train Register, Tinsley had
no clear knowledge of the position of the local train.
- Point 6: Rule violations compromised safety.
- The unorthodox shift change broke the rules and confused the signalmen.
- Meakin's lack of use of the lever collars confused Tinsley.
- If Hutchinson had insisted that the lever collars be placed on the signal levers, Tinsley
would have known the local train was on the up main line.
- The cleared block indicator further confused Tinsley. It should have stayed in the
'train on line' position.
- No 'blocking back' signal was sent to Kirkpatrick as required to protect the local
train.
- Tinsley assumed that Meakin had released the local or moved it somewhere else to make way
for the troop train. But Meakin didn't tell him.
All of the above contributed to the accident. If any ONE of these six points had not been
present, the accident would not have happened.
Final Conclusion:
If all of the rules had been obeyed, no accident would have happened.
Glossary of railway terms
Works Cited
- Rolt, L. T. C. Red for Danger, 1966 David and Charles LTD, Newton Abbot,
Devon UK
- Druitt, Lt Col E Accident at Quintinshill on 22 May 1915, 6/17/1915 Board
of Trade. Whitehall, London, UK
http://www.railwaysarchive.co.uk/documents/BoT_Quin1915.pdf
- Public domain photographs found at
http://en.wikipedia.org/wiki/File:Quintinshill_rail_disaster_-_Secours-voiture-de-queue.jpg
Note that, since the crash occurred in 1915, most materials on it entered the public domain
long before the extension of copyright periods.
Home