CHOOSING A STUDIO MIXER
You have your brand new multitrack recorder. Now you want to record something on it. Suddenly, you realize that you
need mic preamps, a way to mix sounds together, ways to monitor what you are doing, and a way to make the final stereo
mix. In short, you need a mixing console. But which one? The choice requires a lot of thought.
|
Obviously, you are going to need a console with very good mic preamps. That is a given fact in this discussion.
But you need much more than that. You need the ability to control the flow of audio signals from the various sources
and tracks, and make them end up where and when you want them, at the tape tracks, the monitor outputs, and/or the
mixdown recorder, all under your control. So the choice of a mixing console is critical to the smooth functioning of
your studio. If you choose the wrong mixer, you will spend a lot of time pulling your hair out after making mistakes,
or when unable to do what you want to do.
|
|
CHOOSING THE NUMBER OF CHANNEL STRIPS
AND SUBMASTER BUSES
The most common error in choosing a mixer is not allowing for enough channel strips. The novice says, "I have an
8-track recorder, so I will need 8 channel strips." He forgets about effect returns, submixing, and bouncing.
On the other hand, he often overbuys on mixing buses. If he has an 8-track recorder, he thinks he needs a mixing bus
for each track. If the console does not have any direct outputs, this is true. But if direct outputs are available, 4,
or even just 2, mixing buses are sufficient.
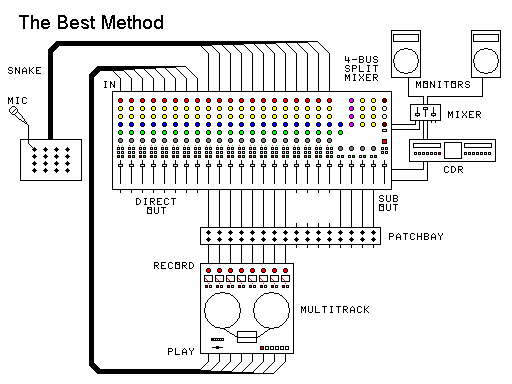
THE BEST METHOD: USING A SPLIT CONSOLE
|
The split console method involves connecting the direct outputs of the channel strips used for inputs through a
patchbay to the track inputs, and also providing the submaster bus outputs at the patchbay. The tape returns have
their own channel strips. You need more channel strips with this method, but have a much simpler console to use. You
will also find fewer situations where you cannot do what you want to do due to setup limitations.
Notice how the channel strips are separated into two groups: tape returns, and source inputs.
- Let n be the number of tracks on your multitrack recorder.
- Let s be the largest number of sources you intend to record on your multitrack recorder
in one take.
- Let e be the largest number of effects you intend to use on your mixer in one take.
- Let b be the number of simultaneous but separate mixes you will ever need to do on your
mixer in one take. This includes all mixdown and bouncing functions, as well as submixing onto single tracks.
It is better to overestimate the numbers, rather than falling short and having to get another mixer in a hurry.
|
|
For this method, you need the following:
- The mixer must have a number of channel strips greater or equal to n + s. Also add in any of
the e effects you want to EQ or pan.
- The mixer must have Direct Outputs on at least the first 2n channel strips. (One alternative
is to trade the track inputs and source inputs. Then you need only n Direct Outputs.)
- The number of Submaster Buses must be greater or equal to b.
- The number of after-fader Aux Sends and Aux Return sets must be greater than or equal to e.
- You will also need a patchbay with at least n + b positions on it.
This setup is connected up as follows:
- Use a short patching snake to connect the multitrack Playback Outputs to the mixer. Connect n
cables in the short snake to the first n channel strip Inputs on the mixer. Connect the other ends
to the n Playback Outputs on the multitrack.
- Use a box-end snake to connect the studio area to the mixer. This doubles as a patch panel for selecting the
track each instrument is recorded on. Connect the first s Snake Positions to the next
s channel strip Inputs on the mixer (after the tape return strips). After providing snake
connections for studio monitors, connect the rest of the snake positions to remaining channel strips Inputs on the
mixer.
- For an n-track multitrack, reserve the first n channel strips on the mixer for tape returns,
and the next n channel strips for feeding tracks directly from sources. Connect the Direct
Outputs on the n strips for sources to the rear-panel Inputs of the first n
positions on the patchbay. Use a small snake to reduce noise.
- Configure the first n positions on the patchbay as Half-Normal.
- Connect the rear-panel Outputs of the first n positions of the patchbay to the
n Track Inputs on the multitrack recorder. Use a small snake to reduce noise.
- Connect each Submaster Bus Output on the mixer to a rear-panel Input on a patchbay position. Configure these
patchbay positions as Parallel.
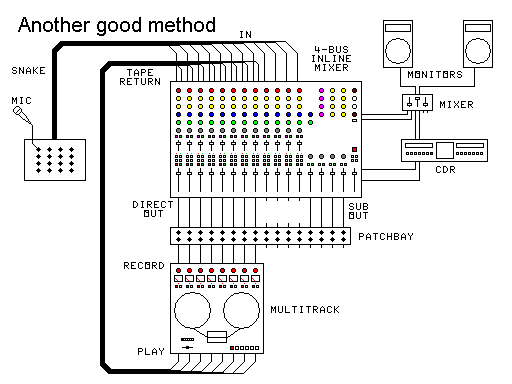
ANOTHER METHOD: USING AN INLINE CONSOLE
|
The inline console method also involves connecting the direct outputs of the channel strips used for inputs
through a patchbay to the track inputs, and also providing the submaster bus outputs at the patchbay. But here,
the tape returns come into special inputs on the same channel strips that feed the tape tracks. You need fewer
channel strips with this method, but have a much more complicated console to use. You will also find some
situations where you cannot do what you want to do due to setup limitations.
Notice how the tape returns have different controls on the same channel strips that are also handling
source inputs.
- Let n be the number of tracks on your multitrack recorder.
- Let s be the largest number of sources you intend to record on your multitrack recorder
in one take.
- Let e be the largest number of effects you intend to use on your mixer in one take.
- Let b be the number of simultaneous but separate mixes you will ever need to do on your
mixer in one take. This includes all mixdown and bouncing functions, as well as submixing onto single tracks.
- It is better to overestimate the numbers, rather than falling short and having to get another mixer in a
hurry.
|
|
For this method, you need the following:
- The mixer must have a number of channel strips greater or equal to the larger of n or
s. Also add in any of the e effects you want to EQ or pan.
- The mixer must have Dual Inline channels with Direct Outputs on at least the first n channel
strips.
- The number of Submaster Buses must be greater or equal to b.
- The number of after-fader aux sends and aux returns must be greater than or equal to e.
- You will also need a patchbay with at least n + b positions on it.
This setup is connected up as follows:
- Use a short patching snake to connect the multitrack Playback Outputs to the mixer. Connect n
short snake positions to the first n channel strip Tape Returns on the mixer. Connect the other ends
to the n Playback Outputs on the multitrack.
- Use a box-end snake to connect the studio area to the mixer. This doubles as a patch panel for selecting the
track each instrument is recorded on. Connect the first s snake positions to the first
s channel strip Inputs on the mixer (including the tape return strips). After providing snake
connections for studio monitors, connect the rest of the snake positions to remaining channel strip Inputs
on the mixer.
- For an n-track multitrack, reserve the first n for tape returns and for feeding tracks directly
from sources. Connect the Direct Outputs on these strips to the rear-panel Inputs of the first n
positions on the patchbay. Use a small snake to reduce noise.
- Configure the first n positions on the patchbay as Half-Normal.
- Connect the rear-panel Outputs of the first n positions of the patchbay to the n
Track Inputs on the multitrack recorder. Use a small snake to reduce noise.
- Connect each Submaster Bus Output on the mixer to a rear-panel Input on a patchbay position. Configure these
patchbay positions as Parallel.
To learn how to use the patchbay to control your recording and mixing, see the second half of this
article. The same method is used whether you have a split or an inline console.
Notice that an inline console can be used as a split console if desired. But a split console cannot be used as
an inline console.
THE SOLO FUNCTION IS CRITICAL
It may seem trivial now, but the SOLO function of a mixer can be the best helper you have when things get
tight -- or your worst enemy, if it is not the right kind of solo.
OTHER IMPORTANT THINGS TO LOOK FOR
WHEN CHOOSING A MIXER
- When choosing the number of submaster busses, consider that you might mix in surround sound in the future.
- Make sure you have enough Pre-Fader Aux Sends (Monitor Sends) to keep your musicians able to hear what they are
doing, even when several are playing at the same time. You can use another patchbay to route Monitor Sends to the
various monitors and musicians. The use of "More Me" boxes also lets you use fewer sends.
- Make sure you have enough After-Fader Aux Sends (Effects Sends) to run all of the effects you will ever need to
use simultaneously in one take. You can use another patchbay to route Effect Sends to the various effects.
- If the console has switchable Pre-Fader/After-Fader sends, you can use a patchbay to run them to monitors during
takes, and to effects during bounces or mixdowns.
- The number of Aux Returns should be enough to handle the largest number of effects you wish to use
simultaneously. You can use a patchbay to increase flexibility here too. But note carefully the TYPE of aux returns
you have. You may wish to use some channel strips for some types of effects, particularly if you want to pan or EQ
them. If so, add these to the total number of channel strips.
- Do you need stereo channel strips? They are great for stereo devices, such as keyboards or CD players.
- Don't forget the EQ (equalization). The best mixers have sweepable, or even parametric, equalization on each
channel strip.
- Insist on a low-cut filter. Most sources add only mud in the area below 100 Hz. You can clean up your
recordings by cutting this out on everything but bass, drums, and other very low frequency instruments
(that digeridoo).
- Before choosing an inline console, make sure it can trade the Tape Return Input with the regular Input, on a
channel-by-channel basis. Otherwise, you may not be able to mix down or bounce without serious repatching.
- Check out the channel strip assign and muting functions. Be wary of mixers that do both with the same button.
You may find out that you can't mute a channel if you are using all of the buses. Or worse, the Effects Sends on
a channel strip may not work unless the strip is assigned to the main (L-R) buses. Try these things out first
before buying.
If you check out carefully all of the features of many mixers before
buying, you will end up with one that makes your recording a lot easier to
do. Remember that you need to consider all of these things when choosing
your recording mixer:
- Channel Preamps
- Console type - split or inline
- Number of channel strips
- Number of mixing buses
- How mixing buses are assigned
- Type of solo function
- Type of mute function
- Number of pre-fader monitor sends
- Number of after-fader effect sends
- Number and type of effect returns
- EQ and filters
Choose wisely!
Links: