BUILD YOUR OWN
SPECTROSCOPE
ANALYZE LIGHT SOURCES WITH THIS HANDY TOOL
Other pages on this website use the spectra of light sources to analyze the quality or kind of light
emitted by various sources of light. The following article shows how the page author obtained these
spectra.
The page author has used three different methods to obtain spectra. They are categorized in this
table according to how well they work and what can be seen with them.
| METHOD | OBSERVATION | COMPARISON | POSSIBLE TROUBLE |
Diffraction grating glasses
| Direct View |
Memory | Multiple light sources clutter spectra,
Size of source |
Diffraction grating glasses
and wrapping paper tube | Direct View |
Memory | Other light sources shine inside tube,
Size of source |
Diffraction grating glasses,
wrapping paper tube, and slit | Direct View |
Memory | Other light hits tube |
Diffraction grating glasses
and black cardboard with hole | Direct View |
Memory | Light shining on cardboard |
Compact Disc
| Direct View |
Memory | Multiple light sources clutter spectra |
Compact Disc, slit,
and housing | Direct View |
Memory | Difficulty of aligning spectroscope parts |
Diffraction grating
and camera | Photography |
Cut and paste | Multiple light sources clutter spectra
Size of source |
Diffraction grating, camera,
and wrapping paper tube | Photography |
Cut and paste | Other light sources shine inside tube
Alignment difficulties |
Diffraction grating, camera,
wrapping paper tube, and slit | Photography |
cut and paste | Light shining on cardboard
Alignment is very difficult |
CAUTION! Do not use any of these spectroscopes to look at or photograph the sun.
The light from the sun is too intense, and will damage your eyes or a camera. Put a small white
object in the sun on a dark background, and observe the spectrum of the light coming from this white
object.
Obtaining the spectrum
There are several easy to find ways to obtain a spectrum:
- Diffraction Grating Glasses
These can be obtained at any education supply store, and at many novelty, toy, or party
stores. Most of them make 4 spectra in a cross around the light, with more at other angles.
This is the easiest to use device. Put on the glasses. One lens can also be placed over the
lens of a camera.
These are cheap. Obtain several pair, as you might want to let others use them, or to cut up a
pair to build something else.
- Other diffraction grating sheeting
This is harder to get. Some education supply stores have it, and it can be ordered from
Edmund Scientific.
Look through it, or place it in front of a camera lens
- Compact Disc
This is easily obtained. One suggestion is to use a CD that comes in an advertising packet,
or as a computer supplement of a book you don't plan to use. This way, you don't tie up a music
or installation CD.
This is harder to use and align, because the spectrum is a reflection from the CD surface.
It occurs at an odd angle. It is hard to determine which source is being observed if multiple
light sources are in the area. Also, some CDs exhibit multiple overlapping spectra. Avoid
those CDs.
- Prism
This can be found at Edmund Scientific or at many education supply stores. Be sure to get an
equilateral prism, not a 45-45-90 prism.
The chief problem with a prism is aligning it. The light comes in at an odd angle to the prism,
and the spectrum leaves it at multiple angles. It will not be further covered here.
Using Diffraction Grating Glasses
There are several easy to observe a spectrum with diffraction grating glasses:
- Using the diffraction grating glasses in a darkened room
The diffraction grating glasses can be used in a room with no other light source than the
light source being tested. Place the source against a dark background, and get as far away from
the source as the room allows. This should produce a spectrum detailed enough to show gaps and
variations in brightness in the spectrum.
A camera can be used. Place one of the diffraction lenses over the camera lens, point the
camera at the light source, and take the photo.
- Using the diffraction grating glasses outdoors at night
The diffraction grating glasses can be used outdoors at night to observe isolated light sources
light source being tested. Get as far away from the source as possible while still getting a good
spectrum without interference from other sources. This should produce a spectrum detailed enough to
show gaps and variations in brightness in the spectrum.
A camera can be used. Place one of the diffraction lenses of the glasses over the camera lens,
point the camera at the light source, and take the photo.
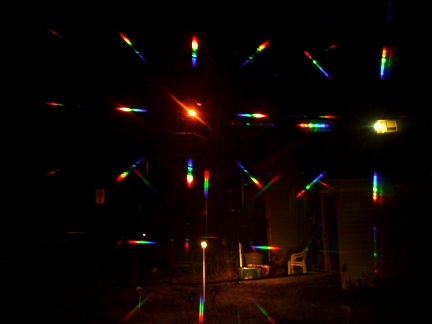 The photo at the right was taken with this method. It shows three different light sources, with
their spectra surrounding them:
The photo at the right was taken with this method. It shows three different light sources, with
their spectra surrounding them:
- The source at the upper left is a high-pressure sodium streetlight. Notice the gaps in the
spectrum and overall orange color that are characteristic of the high pressure sodium lamp.
- The source at the upper right is a daylight compact fluorescent lamp. There are wooden
objects around it, accounting for the yellow glow. Only the lamp itself was bright enough to
generate a spectrum in the photo. Note especially in the diagonal spectral images that the
spectrum consists of a series of bright lines, causing dots to appear in the spectrum.
- The source near the bottom is an incandescent lamp. The spectrum is continuous, but notice
how dim the blue portion is. The white line below the lamp is the post the lamp is on,
illuminated by another light source near the camera. Objects on the ground to the right of the
post lamp are lit by both the post lamp and the source near the camera.
Notice also that halation in the film emulsion made the image of the sodium vapor lamp larger
than it really was.
A diffraction effect caused by microscopic streaks from the wipers on the auto windshield the
photo was taken through made a diagonal streak through the image of the sodium vapor lamp.
The spectra are not in straight lines with the sources because of distortions in the light
paths caused by the curvature of the windshield.
Two of these spectra were cut and pasted into images used on other pages on this website.
In a few places, the second-order spectra appear about twice as far away as the primary
spectra are.
To see the image larger, right-click the image, select View Image, and then use ctrl+
repeatedly to enlarge it. Use ctrl0 to restore normal size before clicking Back.
- Using the diffraction grating glasses with a wrapping paper tube and optional
slit
The diffraction grating glasses can be used with a cardboard tube from the center of a roll
of decorated paper used to wrap presents. Put the glasses on, close one eye, and then look
through the tube and the glasses at the light source. This should produce a spectrum detailed
enough to show gaps and variations in brightness in the spectrum.
A camera can be used. Place one of the diffraction lenses and the tube over the camera lens,
point the camera and tube at the light source, and take the photo. Keeping the tube aligned with
the camera's optical axis is the hard part.
For an even finer spectrum, tape black paper over the end of the tube away from your eye, and
cut a slit in it with a razor blade. Rotate the tube until the slit is perpendicular to one of
the spectra. This probably can not be photographed.
Using a Sheet of Diffraction Grating Material
Transparent diffraction material can be used in the same way the diffraction grating glasses are
used. Hold it near the lens of the eye or the camera.
Reflective diffraction grating is used in the same way the CD is used (see below). It has the
same limitations, except that there is no curvature making the red wider than the blue. It has the
additional limitation that the sheet must be kept flat.
Most sheets of diffraction grating produce only two spectra in opposite directions, rather than
four in a cross. There are no spectra at other odd angles. This makes it easier to sort the spectra
of different light sources seen at the same time.
Using a Compact Disc
A compact disc can be used to obtain a quick look at the spectrum of a light source:
- Turn so the source is behind you and to one side.
- Hold the CD near your face, or the entire spectrum will not be visible.
- Close the eye away from the CD.
- Look at the source reflected in the shiny side of the cd.
- Turn the CD so the image of the desired source is at the rim on the side closest to your
nose.
- The spectrum of the source will be on the side of the center hole opposite from the image of
the source.
- Adjust the distance of the CD from your eye and the angle of the CD until you can see the
entire spectrum.
This would be very hard to photograph, because the alignment is critical.
The red part of the spectrum will be wider than the blue part because the recording is made in
a circular direction around the disc.
Using a Prism
A prism is much harder to use than any of the other devices mentioned above. A device must be
used to keep the light source, the prism, and the observer or camera lined up.
This page will not further cover the prism.
Tricks in the Eye
Unusual characteristics of the eye:
- The eye has a dip in the response in the cyan region of the spectrum. At lower light
levels, cyan looks darker than other colors. This is because the green and blue cones are both
on the slopes of their sensitivity curves at that point.
- The eye is a poor judge of intensity variations.
- Eyes become less sensitive to blue as they age.
- The image of a bright source may expand in size due to halation (scattering of light in the
retina cells).
Tricks in the Film Camera
Unusual characteristics of film:
- Different brands of film, and different products by the same brand, may have totally different
responses to the various wavelengths of light.
- Most film emulsions (monochrome or color) are much more sensitive to blue light than to other
colors. The development process compensates for this in color film, but not in monochrome
film.
- If the amount of light is insufficient, color films may not respond to light colors in between
the primary colors. A continuous spectrum might appear as separated bands of red, green, and blue,
with no colors in between.
- If the spectrum is overexposed, color film may show the color of the light wrong, but the
location in the spectrum will still be correct.
- Many brands of film respond to wavelengths outside the visible spectrum. They can record
ultraviolet as blue or violet, and/or infrared as red. This might give you colors in your
spectrum outside the normal human vision range. Test this by looking at the spectrum of the
source you see through the grating with the spectrum in the photo.
- Development of spectrum films by automatic commercial developing labs may leave the pictures
with altered colors and low contrast. Their automatic settings are designed to adjust the settings
to make photos look "normal," with the average characteristics of ordinary home photos.
The automatic settings must be overridden to print the high contrasts of spectrum photos.
- The image of a bright source may expand in size due to halation (scattering of light in the
film emulsion).
- If the camera has a focal-plane shutter, camera or source motion might distort the location or
shape of the spectrum.
Tricks in the Digital Camera
Unusual characteristics of digital cameras:
- Different brands of cameras and different products by the same brand may have totally
different responses to different wavelengths of light.
- Most cameras do not have perfectly flat response, but record different wavelengths at
different intensities for the same luminance.
- A few digital cameras have gaps in their spectral response.
- Silicon sensors, unlike film emulsion, have a nonlinear response to changes in light level.
This can change the color or intensity of parts of the recorded spectrum.
- If the amount of light is insufficient, color camera grids may not respond to light colors in
between the primary colors. A continuous spectrum might appear as separated bands of red, green,
and blue, with darker or no colors in between.
- If the spectrum is overexposed, the light may trigger pixels of the wrong color, making the
spectrum desaturated. But the location in the spectrum will still be correct.
- Many digital cameras respond to wavelengths outside the visible spectrum. They can record
ultraviolet as blue or violet, and/or infrared as red. This might give you colors in your
spectrum outside the normal human vision range. Test this by looking at the spectrum of the
source you see through the grating with the spectrum in the photo.
- Automatic image processing can distort the colors of the spectra. Use it with care.
- The image of a bright source may expand in size due to halation (scattering of light in the
light detector matrix).
- Camera or source motion during the photo may cause the image to be distorted or blurred. The
scanning order of the frame is important here. The following table shows how some cameras can
bend the image, while others will separate the primary colors in the image if the source or the
camera moves during photography:
| Sequence Name |
Scanning Order |
Effect of Vertical Motion |
Effect of Horizontal Motion |
Effects on a Spectrum |
| 1 |
2 |
3 |
4 |
| Latched Pixel |
Simultaneous* |
Only motion blur |
Only motion blur |
Only motion blur |
| Dot Sequential |
Color |
Horiz |
Vert |
- |
Slight |
Slanted vertical lines |
Slanted vertical lines |
| Line Sequential |
Horiz |
Color |
Vert |
- |
Slight color shifting |
Slanted vertical lines |
Shifted colors, slanting |
| Frame Sequential |
Horiz |
Vert |
Color |
- |
Separation of primary colors |
Separation of primary colors |
Separation of primary colors |
| NTSC Interlace† |
Color |
Horiz |
Vert |
Field |
Duplication of object |
Duplication of object |
Duplication of spectrum |
* Pixel values are simultaneously latched or accumulated multiple times. This is more
expensive to manufacture.
† Interlace scans a field of odd lines, followed by a field of even lines. This
is usually found when a TV camera is used for collecting images. It is the effect that turns
moths into the mysterious "rods" that pseudoscientists say are "alien life
forms."
Light Source Seen on a Monitor Screen
Do not try to find the spectrum of a light source that is shown on a TV or monitor screen.
You are looking at the spectrum of the monitor screen, not the spectrum of the source. The
light from the source has already been color-separated into RGB signals, so the only variation
in the monitor spectrum will be the strengths of the red, green, and blue phosphors.
You can NOT match colors under different lights using either RGB representations of them or
CMY printouts approximating them. They will have totally different color properties.
Never use a swatchbook printed on a color printer or mass-produced using three-color (CMY) or
four-color (CMYK) printing to match pigment colors or select paint colors for a room. Anything
other than a swatch of the actual paint or pigment used is useless for this purpose. The actual
pigment will be affected by different lights in ways different from the way the inks in the
swatchbook are affected.
Spectrum of a Monitor Screen
 Use the image at right to view the spectrum of your monitor.
To view it in isolation, right click on it and choose View Image. Then use the View menu to
select Full Screen. This makes everything black except the white marks. Turn off the room lights.
Now use the spectroscope.
Look to the right or the left of the marks to see the spectra. Three widths are provided for
spectroscopes of different efficiency.
The three colored marks allow you to see the spectra of the single red, green, and blue
phosphors.
The spectra of phosphor (CRT) screens, LCD (liquid crystal) screens, LED (light emitting
diode) screens, and plasma screens should be different, but not too much different. All of them
need the three primary colors of light: red, green, and blue.
To leave full screen mode, move the mouse to the top of the screen and select the Restore
icon. Then use the Back button to return to this web page.